


You’ve invested in a beautiful beef roast and now we are here to make sure you are able to cook a perfect prime rib, tenderloin, or other large beef cut with this tutorial and prime rib recipe!
Is there anything more festive, impressive, and luxurious than a big juicy beef roast? It’s easy to make outdoors and it definitely tastes better, but my prime rib recipe works fine indoors and for all types of beef roasts. Here’s how to cook a perfect prime rib or other beef roast.
Our goals
Here are the benchmarks we will strive for. I will explain each in more detail later in the article.
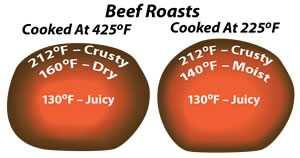
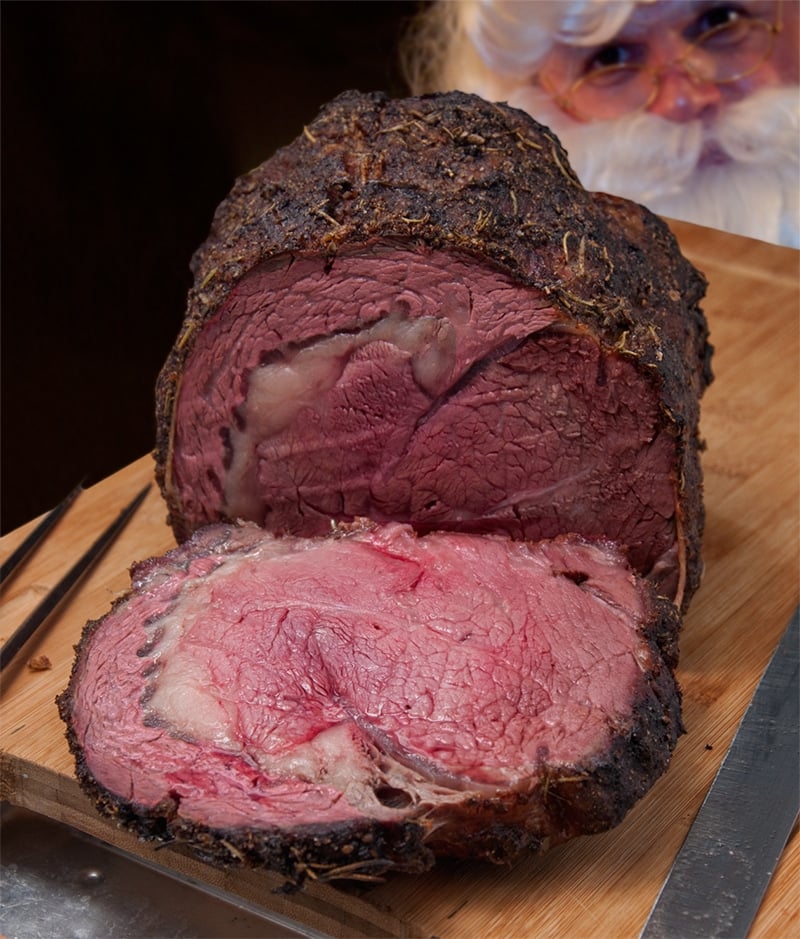
1) Maximum tenderness and juiciness. Beef roasts are at their best when cooked to 130°F to 135°F internal temp. That’s medium rare, when it is no longer purple but deep red, and not yet pink.
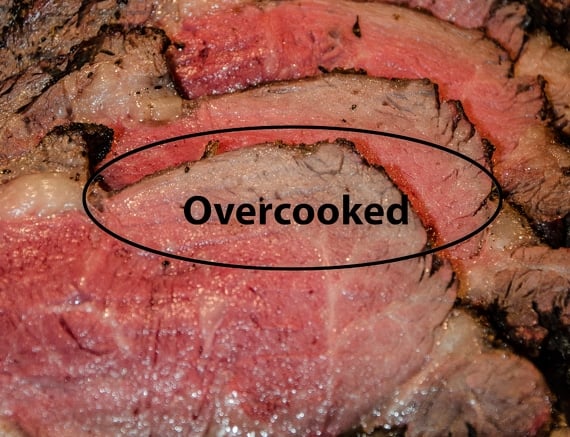
2) Even color. We want the same red color bumper to bumper with no overcooked meat beyond 1/4″ deep. We don’t want a rainbow of colors starting with a band of gray meat below the crust, then tan, then pink, and finally, in the center, just a bit of properly cooked red meat.
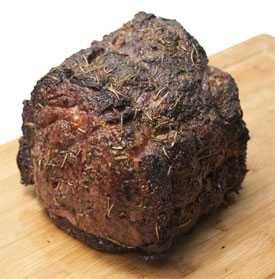
3) Crust. We want a lot of deep dark crunchy crust enriched by salt, herbs, and spices mixing with beef juices that are squeezed out by heat, and dried to a bark by the roasting process.
4) Easy carving. We don’t want to struggle with removing a rack of bones at the table, we don’t want juice all over the tablecloth, and we don’t want to look more foolish than usual.
How we will accomplish our goals and cook a perfect prime rib
1) If we can afford it, we will buy a prime rib, but others will work fine. Overall, rib roasts are the most tender, juicy, flavorful, and expensive, especially when you consider the considerable waste from trimming. Strip loin is close behind, a chuck eye roast can be darn close and a lot cheaper, and top sirloin butt can be superb and cheaper still. Tenderloin is slightly more tender, but not as juicy and flavorful. In this article I will focus on the prime rib, but the method works the same for other cuts.
2) We will have our butcher cut off the bones if we buy prime rib or strip loin. The rib bones cover almost 1/3 of the surface of a rib roast reducing the amount of crust significantly. Everybody loves crust. Removing the bones for this prime rib recipe increases the love. And contrary to myth, bones do not add flavor to a roast (click the link for proof).
3) We will use a digital thermometer to make sure you don’t overcook or undercook. As little as 10°F in the wrong direction can make enough of a difference to draw complaints from the critical side of the family. You can use a probe that you leave in the meat and it will tell you how things are progressing. Or, you can use an instant read that you use to poke it occasionally. (Don’t worry, meat is 75% water and no one will ever notice the few drops that escape when you stab it).
Most rib roasts are served rare to medium rare, 130°F to 135°F, in the center. I usually shoot for 130°F. If you have people who insist on medium well or well done, explain to them that meat is most tender and juicy at 130-135F, and that is medium rare, a fact that is proven by machines. Then explain that the red is not blood! It is caused bu a protein called myoglobin. All the blood was removed long ago.
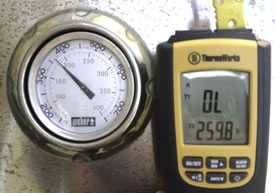
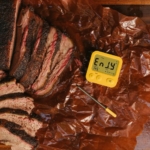
Remember, you cook with a thermometer, not a clock, and your cooker’s thermometer is not reliable. Many are off as much as 50°F, even on fancy grills! Look at the picture below: The dial thermometer on the expensive grill says 360°F when the digital says it is really 260°F! That’s the worst I’ve ever seen, but it makes the point. You really need a good digital oven thermometer and another good digital meat thermometer. You cannot trust a dial thermometer. Please read my article on thermometers.
4) We will use the bones for a great gravy. We will make a potent dark but thin gravy from the rib bones and amp up the flavor by letting it sit in a pan below the roast and catch drippings. This prime rib recipe creates a gravy with a deep, beefy flavor and be fortified by bone marrow, seasonings from the meat, and just a kiss of smoke. We will not thicken the gravy with flour or other starches so it can penetrate the meat when we serve it. We can even make it in advance.
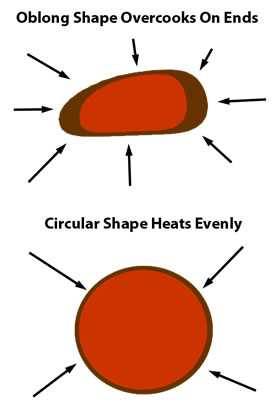
5) We will make the roast round. Oblong roasts cook unevenly with the ends and corners cooking faster. This is because the heat attacks them on more sides. That’s why lasagna in the corners of a rectangular pan is dry. With bones removed, we can cinch it up so it is closer to round.
6) We will remove the fat cap. We will remove most of the surface fat for this prime rib recipe. A surprising number of people don’t like prime rib because of all the fat. Yes, I know fat is flavor, but the fat we want is within the muscle, not on top of it. Surface fat does not melt and penetrate muscle fiber. That’s an old husband’s tale. Muscle is mostly water, and fat and water just don’t mix. Some of the fat just melts off, but most of it remains on top of the meat. Your guests will trim it off when you serve it and they will not get to taste the crust you have nurtured. We want the seasoning on the meat, not on the fat.
7) We will dry brine. A day or two in advance we will salt the exterior liberally. Juices will come out of the meat and melt the salt, pull it into the meat, and over a couple of days, pull it deep into the center. The salt enhances the ability of the protein to hang onto moisture during cooking and enhances the flavor throughout.
8) We will coat it with a rub. For this prime rib recipe, we will coat the meat with a rub of herbs and spices that will create a flavorful “bark”.
9) We will go straight from the fridge to the cooker. Many recipes tell you to leave the meat out for an hour to come to room temp. To warm a 4″ thick log of meat to room temp up will take at least 10 hours—not a good idea from a safety standpoint. Read my article on warming meat to room temp to learn more. Besides, smoke sticks better to cold meat. So go straight from fridge to cooker.
10) We will give it a kiss of smoke. When preparing this perfect prime rib recipe outdoors, we will add wood to the fire, just a small amount, to give it an exotic smoky undertone in the background. The smoke will adhere to the crust and will not penetrate deeply, and that’s good because we do not want to mask the wonderful flavor of beef.
11) We will reverse sear. Browning the exterior generates deep rich flavors from a chemical reaction called the Maillard reaction and caramelization of sugars. Darken it too much and you can carbonize it and burn off all the rub.
We start low and slow with the lid closed away from the flame with indirect convection heat. This will allow the interior of this thick piece of meat to heat slowly and evenly. It takes time for heat to move from the air into the outer layer of the meat and then from the outer layer down to the center. No matter how much heat you apply to the outside of a roast, it takes time for it to move to the center.
If you start off with high heat, you build up heat in the outer layer. It is like a capacitor storing energy. Searing first is a recipe for an outer layer of gray meat. If you cook the whole roast low and slow, and sear at the end it takes much less heat to brown the outside since the outside is already hot, and when you sear at the end the heat doesn’t penetrate nearly as much. You end up with less overcooked meat. Indoors, you just put the meat under the broiler at the end of the cook.
Now I know all the recipe books say to sear first and cook hot, but that’s a mistake. It is just an age old non-scientific tradition that has been handed down for generations.
In addition, low temps are especially important for tougher cuts from the hind end: Rump, round, sirloin, etc. Low and slow gives connective tissue a chance to melt and make chewing easier.
I know this method sounds backwards, but it works much better than searing first.
12) We will keep the meat above the roasting pan. When the meat sits within a roasting pan, the pan blocks airflow and the meat doesn’t cook properly on the bottom. We will raise the meat well above the pan for even cooking, and we shouldn’t have to turn it while it cooks.
Ordering the right cut if you are going to cook a perfect prime rib
There are many thick cuts of beef perfect for roasting:
Prime rib. The long muscle group that lies on either side of the backbone and above the curved back ribs is the most desirable part of the steer.
The primary muscle running through them both is longissimus dorsi. It is tender, juicy, and woven with thin lacy fat lines that melt during cooking creating deep beefy flavor and richness. The front half of this section is the rib roast, from ribs 6 through 12, and the rear is called the strip loin, described in detail below. Carve the rib roast into steaks and you have ribeyes. Carve the strip loin into steaks and you have strip steaks.
Alas, chances are that gorgeous hunk-o-meat in the butcher case is technically not a “prime rib”, so buyer beware. USDA Prime grade meat, with extensive marbling, is an expensive grade that is sold primarily to restaurants. Most of what we see in stores labeled “prime rib” is really USDA Choice grade or USDA Select grade.
We call it “prime rib” because it comes from a section called the rib primal and that’s what it was called before the USDA grading system was created. Click here for more about beef grades. So USDA grandfathered the term into the rules. What your grocer has is more properly called a rib roast than prime rib if you want to be technically correct, but you can call it prime rib if you want. Everybody else does. Just be careful that your butcher doesn’t charge you for USDA Prime unless it is labeled as such.
You can order USDA Prime grade meat if you wish when preparing to cook a perfect prime rib. It’s a real treat, but bring a wheelbarrow full of cash. USDA Choice is going to make you a pretty darn good dinner because the longissimus is tender and juicy on all but the oldest, crankiest bulls. If it is not labeled USDA Choice, look for Certified Angus Beef (CAB). CAB farmers promise that, in order to qualify for the label, of the three levels of USDA Choice, their meat has been graded at least among the upper two levels.
Or ask your butcher for the best looking, most marbled roast in the house. This is one of those moments when knowing your butcher’s name comes in handy. And hopefully the scent of that half slab of ribs you brought her for lunch last month is still on her fingers. Click here to learn more about the different grades of beef.
A typical prime rib weighs about 2 to 3 pounds per bone with the bone on. This depends on the size and age of the steer and how much fat is left on. In recent years that weight is going up. Allowing for fat and bone waste and 20% shrinkage, you should buy 1 pound per person, or 1 bone width for two people. That will be more than enough and you might have leftovers for killer roast beef sandwiches.
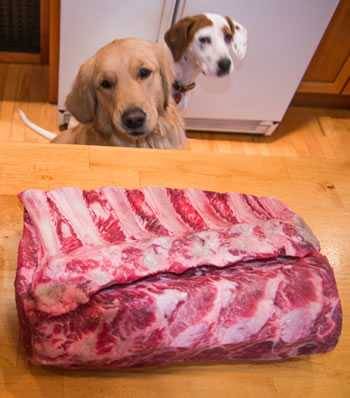
Prime rib is not something most butchers keep in stock. Order a fresh roast, not a frozen roast, well in advance and take delivery about two to three days before you plan to serve it. I like to get bone in, although this means I am paying the same price for bone as for meat, but a bone in roast should be cheaper per pound. A bone-in rib roast is often called a “standing rib roast” because the curved back ribs make a great stand for roasting the meat. Make sure the chine, which is where the ribs connect to the spine, is cut through or removed. If you request 28 day wet aged, you’ll pay more, but it will be a bit more tender. Just a bit, and this is already a tender cut. Dry aged is something else altogether. The flavor is not for everyone.
Here is my typical order for Christmas dinner. One beef rib roast, bone in, chine removed, USDA top choice or USDA prime, 7 bones (for 10 adults and 5 kids), never frozen, 28 day wet aged (but I will take it unaged), for pickup on the morning of 12/23.
Strip loin, short loin, tenderloin, and other noteworthy roasts
While the cooking the perfect prime rib is the gold standard, there are other superb roasts for the budget minded. For a list of most of them, go to my article on the different cuts of beef. Here are some of my favorites.
Strip loin and short loin. This is the section just behind the prime rib, and it contains the last rib, number 13, and it extends back to where the sirloins start. It is very similar in flavor and tenderness to the rib roast because it is primarily the same longissimus dorsi muscle, the muscle that makes up most of the prime rib. When you slice it into steaks, you have strip steaks (and for the record, Kansas City strips and New York strips are all the same). This primal also contains T-bone steaks and porterhouse steaks towards the rear where the tenderloin attaches to the underside.
Tenderloin. This is the most tender cut on the animal. It is the shape of a baseball bat, just a bit shorter. You can cook it whole, slice it into filet mignon steaks, and, when trimmed, the center section is a uniform thickness. This is called the chateaubriand. Although it is very tender, there is very little fat marbling, and it is less tasty than the meat from the rib sections. It cooks quickly and shrinks little. It is expensive. Click here for a whole article on tenderloin.
Tri-tip. This cut is from the area below the top sirloin and is usually boomerang shaped. It is very popular in southern California, but it is not well known in the rest of the country. Because it is a regional barbecue specialty, I have devoted a whole page to it.
Chuck eye roll, chuck roast, or shoulder clod. The shoulder is a large knot of muscles that work hard, are swaddled in thick bands of fat, elastic connective tissues, an awkward shoulder blade bone, and it has lots of flavor. It lies just in front of the prime rib, and running right through it is the front end of our old friend, the longissimus, the loin muscle that is the bulk of the prime rib, strip loin, and sirloin. The chuck eye roll is the best, called by some the “poor man’s prime rib”, but many butchers don’t separate this cut. If you get the whole roast, prepare to do some trimming before or after the cooking.
Most chuck roasts have a shoulder blade in it making carving tricky. But chuck roll and chuck tender are boneless, beautiful, and much cheaper than rib roasts.

Top sirloin butt. This is from the section that lies just before the hip and is much less expensive than the other roasts from along the back. It has a big beefy flavor but it is a little tougher. Ask the butcher to take the cap off. The cap is a thin flat muscle beneath the fat cap. If it comes on your roast, you can practically peel it off with your hands. Top sirloin butt makes nice thick steaks. The rest of the meat, roasted low and slow, cut across the grain, can be very easy to chew. There are other sirloin roasts, but this is the most tender.
Round. The rear legs from the hip to the knee are called the round, and there are many muscles in there that the butcher can prepare as roasts. In general this meat is rich in beefy flavor, but it can be tough because the legs get a lot of exercise, so reverse sear is a must, as is slicing across the grain. Some of the roasts from the round are called top round, bottom round, outside round, eye of round, and knuckle.
Why go boneless if you are going to cook a perfect prime rib?
Bones get in the way of crust formation. If you are going to cook a perfect prime rib, bear in mind that the bones keep 1/3 of the surface from browning and developing that wonderful rich crust so you should consider removing them. The crust is made of brown flavors, created by the Maillard reaction and caramelization, juices mixed with the rub, melted fats, and it is a real taste treat. When we’ve eaten all the crust we always wish we had more.
Bones don’t add flavor. I know you’ve heard that the bones add flavor. It’s a myth based on the fact that the bones do add flavor to stews, braises, wet cooking methods. But they don’t add flavor to meats cooked by dry cooking methods like roasting. Think about it. Beef ribs are a honeycomb of marrow inside a casing of hard calcium wrapped in a sheath of leathery connective tissue. The marrow is full of flavor but it is not getting through that wall of calcium and the jacket of connective tissue. A small amount of the connective tissue will gelatinize, but not much, and it is not going far, not more than 1/16″ into the muscle tissue.
Bones promote uneven cooking. If you leave the bones on for this prime rib recipe, they make an effective base upon which to stand the roast. But, because they have a honeycomb structure, they are an insulator. They act like a heat shield so the meat directly above is often undercooked. We want the meat to cook evenly throughout. No surprises.
Bones make carving difficult. Another reason to remove the ribs before you set out to cook a perfect prime rib is because they are a pain to remove at the dinner table when you are carving. Unlike a pork roast, you just cannot cut a slice of roast that is one bone wide. One beef bone wide is too much for a normal person. It’s enough for two. To avoid this some people remove the rib slab before cooking and put seasoning on the meat and then tie the bones back on. Fine. But those seasonings and the surface under the bones still don’t brown. So you get intense raw spices and herbs.
Bones make great gravy. On the other hand, if you submerge the bones under water, much of the goodness in the marrow and connective tissue dissolves, and they produce immense pleasure. Bones are the secret to memorable stews, braises, and gravies. So we can use ours for the gravy.

Bones make a great second meal. There’s a significant amount of meat between the bones. A seven bone slab should be a meal for two. If you wish, you can ask your butcher to leave some meat on top of the bones when he cuts them off the roast. Just follow this link for a beef rib recipe.
Bones can start fights! If everyone wants a bone to gnaw, and there aren’t enough to go around, who decides who gets a bone and who doesn’t? I don’t want that job.
Removing the bones. Your butcher should be willing to remove the bones for you. If you get a roast with ribs on, you can remove them easily yourself. Just run your knife on or above the bones leaving on as little meat as possible. (This is unless you want some extra meat on for a second meal). Some butchers routinely remove the ribs and then tie them back on without asking them because they assume you want to cook with them on, as most people do. By tying them back on the butcher is making it easier to carve the roast. If that’s your situation, I recommend you remove the string and the bones will come right off.
If you are going to cook a perfect prime rib and insist on cooking with the ribs actually attached, you should make sure the butcher removes the chine for you. That’s the end of the rib bones where they connect to the spine. The chine also connects the rib bones together. It can be a pain to cut through when you try to separate the bones at carving time. Having the butcher do this makes carving a lot easier. And a lot less embarrassing.
Even if you are cooking a boneless roast, I recommend you tie it every inch or so to hold it together and to help make it round. Your butcher might even do this for you.
Trimming
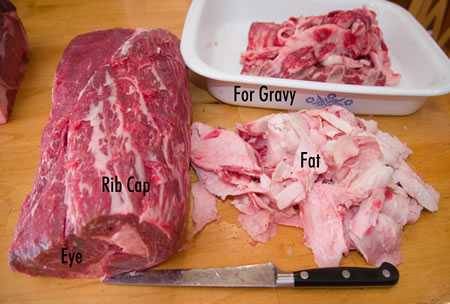
Here’s the breakdown of a full seven bone, 28 day wet aged rib roast I recently cooked:
OR
- 14.5 pounds at $14 per pound for a total of $203
- 2.5 pounds of rib bones which I set aside for another meal (16%)
- 2 pounds of pure fat, some of which I froze for mixing in home ground burgers and some for melting to baste steaks (14%).
- 1.25 pounds of fat with meat scrap attached suitable for gravy, as discussed below (9%).
- 2 pounds of rib cap which I usually take off for a future meal (14%).
- 6.75 pounds eye of ribeye roast (47%).
- After cooking and shrinking (about 10% loss), I ended up with a magnificent tube shaped presentation, dark brown all over, and incredibly juicy, that weighed about 6 pounds, a 41% net yield from the original 14.5 pounds at the cash register, plus two more meals, one meal of the rib cap and one meal of the ribs.
- Leave the rib cap on and you get 8.75 pounds of raw meat. After about 10% shrinkage during cooking you get about 8 pounds, about 55% net yield. That is an effective price of a bit more than $25/pound, with the bones as a bonus meal.
A 12 pound boneless Wagyu strip loin I recently cooked had 3 1/4 pounds of surface fat and yielded 8 3/4 pounds of meat.
Keep in mind that the ends of the roast will be close to well done. If you cook at 225°F there won’t be much well done. Cook hotter and there will be more. If Aunt Harriet doesn’t want hers medium rare, you can always take an end cut and toss back on the grill. She will have a ribeye steak for dinner.
Do not use a roasting pan with a V shaped rack!
They ought to ban roasting pans with V racks. They’re expensive and they hamper proper cooking.
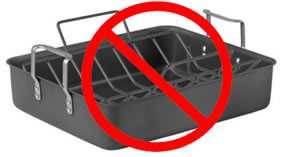
If you are going to cook a perfect prime rib, you want your roast to heat evenly on all sides. If you sit a roast into that V rack, the bottom 1/3 of the meat is sitting behind the walls of the pan. They block airflow around and under the meat so there is a bubble of cooler air below the meat, as much as 100°F cooler, especially if there is liquid in the pan! Unless you roll the meat over, a tricky proposition, the bottom will be undercooked and the bottom crust will be soggy. And never place the meat in the liquid in the pan. We want to roast this meat with dry heat not boil or braise it.
If you must use a roasting pan when attempting to cook a perfect prime rib, see if you can turn the rack upside down or place a wire rack from your oven on top of the pan. Try to get the drip pan at least 2″ below the meat.
Gas grill– place the gravy pan below the cooking grate on top of the deflector bars that cover the burners.
Charcoal grill- place it on the grate that the charcoal will go on. Then, push all the coals off to the other side.
Pellet grill– put the pan on top of the heat deflector.
For a Weber Smokey Mountain or other bullet smokers, put the meat on the top grate and the drip pan on the bottom grate or use the built-in water pan as the drip pan. Just make sure you scrub it clean on the inside.
What determines cooking time?
When it comes to learning how to cook a perfect prime rib or other roast, it’s important to understand that there is no easy rule for the timing of a roast, but there are some guidelines here. The most important determinants of cooking time are the cooking temp, and the thickness of the meat. Not the weight.
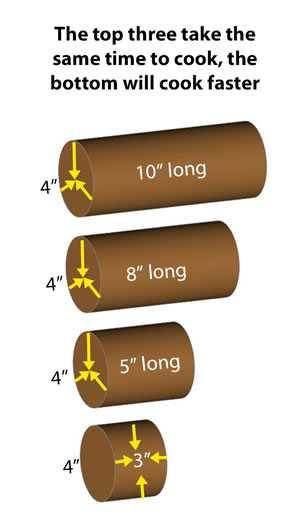
For example, take three roasts 4″ thick, one of them 5″ long, one 8″ long, and one 10″ long. Cook them side by side and they will finish at pretty much the same time because the distance of the center from the surface, i.e., the thickness, is 2″ for all of them. But if you had a fourth roast only 3″ long, it would cook faster because the distance to the center is now 1.5″, not 2″.
Cooking time can also vary significantly depending on a number of other variables: Bone on or off, cap on or cap off (see sidebar on the spinalis), how cold the meat is when you put it in the heat, the ambient temp outside, wind, how well your grill holds temp, humidity in the cooker, and how often you open the lid to take pictures for Facebook. Just below I give you some rules of thumb for calculating cooking time. But remember, it is done when a thermometer tells you, not a clock! Here is an article with a detailed discussion of what determines cooking time.
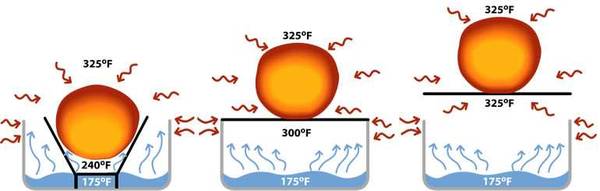
What happens when heat hits meat: More myth busting from Dr. Blonder
The AmazingRibs.com science advisor, Prof. Greg Blonder has been programming a cooking simulator for us so we can see what is actually happening inside the cooker and inside the meat. For this recipe he took a 4″ diameter and 8″ long boneless round tube of meat. This is about the same size as a 5 pound prime rib roast. He put it in a simulated electric oven with thermostatic control.
His simulation shows a cross section through the center of the meat cooking low and slow at 225°F, and then what happens if it rests for 20 minutes. It took 2 hours 20 minutes for the center to reach 118°F. That’s still a bit rare for most folks, but remember I want you to move the roast over hot direct radiant heat at this time, lid open, in order to darken and firm up the crust.
The hot air heats the exterior layer of the meat, and the molecules vibrate rapidly as the energy from the hot air is transferred. Moisture is squeezed out, proteins, fats, and connective tissue molecules change their shape, and the meat changes color. Those molecules pass their excitement on to their neighbors closer to the center, and they pass their excitement on, and so on, like a bucket brigade of excited vibrating molecules. In other words, hot air cooks the outer layer of meat, and the hot outer layer of meat cooks the rest of the meat.
In the side view above you can see clearly how the corners and ends cook more quickly and eventually overcook, and how the resting period allows the heat to distribute itself more evenly and how it rises throughout the roast. Notice how the corners overheat rapidly because heat attacks it on two sides. That’s why brownies in the corner of a square pan are the chewiest. Keep in mind that, even though the temperature of the ends declines during the resting period, the meat has already peaked at 180°F, well past well done (155°F).
Because this resting period can significantly increase the internal temp of the meat, I no longer recommend it. I recommend you start cutting as soon as possible in order to lock in the temp you target. Resting, we have learned, does not improve juiciness.
Dr. Blonder then simulated a cross section of the roast as viewed from the end (below). You can see the exterior layer building heat and helping form the crust. In this view you can clearly see the hot air escaping the meat while it rests.
Want a new set of tools? Check out Meathead’s new book, The Meathead Method. It’s a toolbox that will elevate all your cooking. Alton Brown calls it “The only book on outdoor cookery you’ll ever need.”

Here’s Our Best Beef Roast Recipe
Makes
1 beef roast with gravy, about 5 pounds edible meatIngredients
Method
- Trim. About 24 hours before cooking, remove the rib bones and save them for the gravy or for another meal. The gravy is optional and most of the time I don't bother since the meat is so juicy. There's plenty of meat between the bones and these beef baby backs can be cooked just like pork baby backs for a real treat.
- Trim off all the fat cap from the top. Go ahead and trim right down to the meat. Make sure to get the silverskin too, it can be chewy. Save any pieces that are more meat than fat for the gravy. Save the silverskin for the gravy too. Some of it melts into gelatin.
- I leave most of the fat on the side where the bones were because it is hard to remove and it’s not very thick. But the fat cap has got to go.
- Aim to make it as round as possible. When you have bare meat, it is sort of tear-drop shaped. Press on the sides squishing it into a round tube. If necessary, tie it with string every inch or two to hold it round.
- Dry brine. About 6 to 24 hours before cooking, sprinkle it with about 1/2 teaspoon kosher salt per pound of trimmed meat (1/4 teaspoon table salt). It's a bit hard to measure so here's how I do it. I use kosher salt which is a larger flake than table salt and it still dissolves easily on the moist meat. I sprinkle it from high above so it is evenly distributed. And I sprinkle about the same amount I would if I was about to eat the meat. Thick cuts need a bit more. Do not over salt! Put it in the fridge. This is a method called dry brining. The salt is sucked into the meat, seasons it, and it messes with the protein structure to help retain moisture. There is a lot of meat to penetrate, so you can use the salt generously, but don't make a thick cake of it, and you will not need to rinse it off. It will all be sucked in. You should wrap it with plastic wrap just to keep other foods from coming in contact with meat juice.
- 1 hour before cooking. Make a spice paste with my recipe for Mrs. O'Leary's Cow Crust, a blend of herbs and spices mixed with water. The water releases the flavors in the herbs and spices and helps with browning and forming a crust. Let it sit for at least 1 hour before applying it to the meat so the herbs can reconstitute and release their goodness. Pour most of the paste on top of the roast. Spread it around all visible surfaces working it into the meat. Turn the roast over and pour the rest on the bottom and work it around. It does not penetrate the meat so you can do this any time up to the time you cook. Do not use Meathead's Memphis Dust or any rub with sugar in it because this meat doesn't need sweetness and we don't want the crust to burn. I usually just put it in the fridge without the plastic wrap because I want the flavorings on the meat, not the plastic. It's only for an hour or so, just be careful not to cross contaminate other food with the meat.
- Prepare the gravy. The gravy is really a killer beef stock. You won't need the gravy for the meat because it will be soooo juicy, but you will like it, and you will want it for my Garlic Mashed Potatoes. And you should make my Garlic Mashed Potatoes. Yes you really should. There will be plenty leftover gravy that you can use for Italian Beef Sandwiches, Beef on Wick sandwiches, French Dip Sandwiches, for beef soup, or for making rice or couscous. There is no end of uses for a good, rich, homemade beef stock. But if you want to skip the gravy, nobody will complain unless you overcook the meat.
- To prep the gravy, remove the root ends from the onions and cut the onions into quarters. Peel the carrots and chop into 1-inch pieces. Clean the celery and chop into 1-inch (25 mm) pieces.
- There are three ways to make the gravy. (a) You can make it in advance indoors, (b) you can make it while cooking the roast on the grill, or (c) you can make it in advance indoors and still put it under the roast to catch smokey drippings. All three are excellent.
- You can make a fine gravy with just the meaty trimmings from the roast, but it will be better if you add some bones. If you removed the bones from a rib roast use them. If not, ask your butcher for some beef bones. Throw the bones on a grill in indirect heat at about 325°F (163°C), or in a smoker, or in the oven until they are brown on the outside. If you have a bandsaw, cut the bones in half lengthwise so more marrow is exposed or have your butcher do it. Get a big pot and put all the bones in it. Add the meaty trimmings with the fat attached. Don't throw all the fat in. Add the veggies. If there is no leftover rub, add some of thyme, rosemary, and garlic powder.
- If you are cooking it indoors, turn the pot on low and let it simmer for about 3 hours, lid off. Occasionally skim off any foamy scum. Don’t worry about skimming the fat yet. And don’t worry about alcohol, most of it boils off. Nobody will get tipsy. Your kids won’t be led down the path of degradation.
- After about 3 hours strain out the bones and any other large solids and discard them. Then run the stock through a mesh strainer. Taste it and cook it down if it tastes too bland. When it is the right intensity, then you can adjust the seasonings. Refrigerate it. After several hours the fat will rise to the top and form a thick hard layer. Peel it off and discard it. If you have one of those fat separator cups you can use that. Back in the fridge it goes for now. What remains is a fine beef stock.
- If you wish, you can put all the gravy ingredients into a pan and put it under the roast while it cooks in order to catch the smoky drippings. Another option is to prepare the gravy in advance indoors, strain it, and then put it in a pan under the roast to catch drippings.
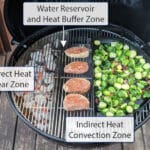
- Fire up. Set up your grill or smoker for 2-zone cooking and preheat the indirect zone to 225°F (107°C). It is very important that you not cook hotter than 250°F (121°C) or so. I don't care what the cookbooks or the TV chefs say. You don't want to cook so hot that the meat gets dark on the outside before it is done on the inside. Watch the computer simulations above.
- Clean the grates thoroughly before the gravy/drip pan goes on. Boil the gravy in a sauce pan and then pour it into the drip pan. Don't pour cold gravy in the pan. If you have a small grill, you can put the pan right over the fire. It then becomes a heat shield and the meat will be in the indirect zone. For more info on setting up your cooker, read my articles on how to setup a gas grill, a charcoal grill, a bullet smoker, and an offset smoker. And you can do this indoors!
- Cook. If you have a meat thermometer with a probe on a cable, and you should, insert it now so the tip is dead center in the thickest part of the meat. If you don't have a probe you can leave in the meat, you absolutely must have a good digital instant read meat thermometer and you should check it every 30 minutes at first, and more often as the cook progresses. You should also have a good oven thermometer that has a probe you can place near the meat in the grill/oven, but place it at least 2" (51 mm) away so it is not in the cold air bubble surrounding cold meat. Read my Thermometer Buying Guide to learn how they work and which are the best.
- If you made the gravy in advance, get it hot and pour it into the drip pan. If you haven’t made it yet, follow the instructions above and put the ingredients in the drip pan. Use hot water or else it will take a long time to heat on the grill and slow everything down.
- Smoke. If you want a smoke flavor in the background add just a little bit of hardwood or fruitwood to the hot part of the cooker, about 2 to 4 ounces (57 to 113 g) max right at the start of the cook. Don't overdo the smoke. A little bit is nice, but too much can ruin it. I cannot overemphasize this. This cut of meat does not benefit from a lot of smoke. Keep it in the background. What kind of wood? I don't think it makes a huge difference since you are using so little. Pick your favorite. I usually grab a fruitwood like apple. Read my article on the science of Wood.
- Monitoring your meat. You will want to look under the hood occasionally during the cook, but make it infrequently and quickly. During the cook check the meat temp after 30 minutes and more frequently as things move along. Check the drip pan, keeping at least 1/2" (1.3 cm) of liquid in the pan. Add hot water if necessary. Do not let it dry out and burn. Look at the meat and if one side is getting too dark, rotate or turn the meat, otherwise there is no need to touch it. If you have a problem with your cooker, perhaps the gas runs out or the charcoals start to die or the temp just won't stay at 225°F (107°C), or it is really cold outside, you can bring it inside after about an hour and finish it in the oven. It has gotten all the smoke flavor you need. But the drier heat and airflow on the grill makes a better crust than the oven.
- Searing. When the temp in the deepest part of the interior reaches 115°F (46°C), remove the probe (it just gets in the way), remove any string if you used it, and place the roast over the hottest part of the grill. Remove the drip pan and bring it inside. Raise the lid and stand by your grill, as Tammy Wynette once sang (click the link for my version of her song). Get the surface a deep dark brown by leaving it on the hot part for about 5 to 10 minutes. Roll it a quarter turn and repeat on all four sides. We leave the lid up because we no longer want to roast the interior. We are focusing the heat on the exterior now. During this process, the interior will rise another 5 to 10°F anyway. Check the temp again and take it off at 130°F (54°C) to 135°F (57°C) for medium rare.
- If you are cooking indoors or on a pellet grill, you can sear under the broiler indoors. If you have a small gas grill just crank it all the way. On a gas smoker, remove the water pan and the wood pan and put the meat down close to the flame.
- Finishing the gravy. While the meat is searing, pour the liquid from the drip pan through a strainer and taste it. It should be rich. If it is wimpy, dump it into a frying pan, turn the heat to high, and reduce it. It will reduce faster in a wide frying pan than in a narrow sauce pan. Taste and add salt if needed only after it is the proper consistency, but it shouldn’t need salt because the drippings have salt in them. Pour the gravy into a gravy boat and serve alongside the platter of meat or ladle it on the mashed potatoes, or just freeze it for later use.
- Serving. There is no need to rest the roast. It is a myth that this makes it more juicy. Serve your meat hot! You will need a cutting board or a platter that can hold liquid. Even if you rest the meat a lot of liquid will flow. Don't let it escape! First remove the string. Use a really sharp knife and cut servings about 1/2" (1.3 cm) thick. Pour any drippings from the cutting board onto the platter of cut meat. If you want to amp it up to 11, serve my Secretariat Horseradish Cream Sauce on the side. Here's a video highlighting the entire process.

Before you can post a comment or question you must sign into our commenting partner, Disqus. This helps make sure everyone hanging around the grill is civil. We do not tolerate nastiness, racism, porn, inappropriate language, or attacks on others. All comments are the property of AmazingRibs.com and we reserve the right to quote them, edit them, delete them, and block people from making future comments.
Please leave comments and questions on the same page that is devoted to that subject so others can see questions and our answers when they are reading about the subject. You must enable JavaScript to use the comments section, and you must accept cookies to post comments. Note: the software that runs Disqus is different from the Pitmaster Club, so members need to sign into the Pitmaster Club separately.