


If you’ve ever wanted to create a smoked brisket at home that’s just as good, if not better, than they do at Texas’ best BBQ joints then this BBQ brisket recipe is for you!
How do you cook a brisket? That is probably the most common question I receive from readers, right up there with How do you cook ribs? Once you master the basics, making smoked brisket is not as difficult as you might think. You just need a good recipe loaded with proven techniques and useful tips. In this article, you’ll find all that and more. I go through everything you need to cook a tender barbecue beef brisket, including how to season it, how long to smoke it, how to slice it, and everything in between!
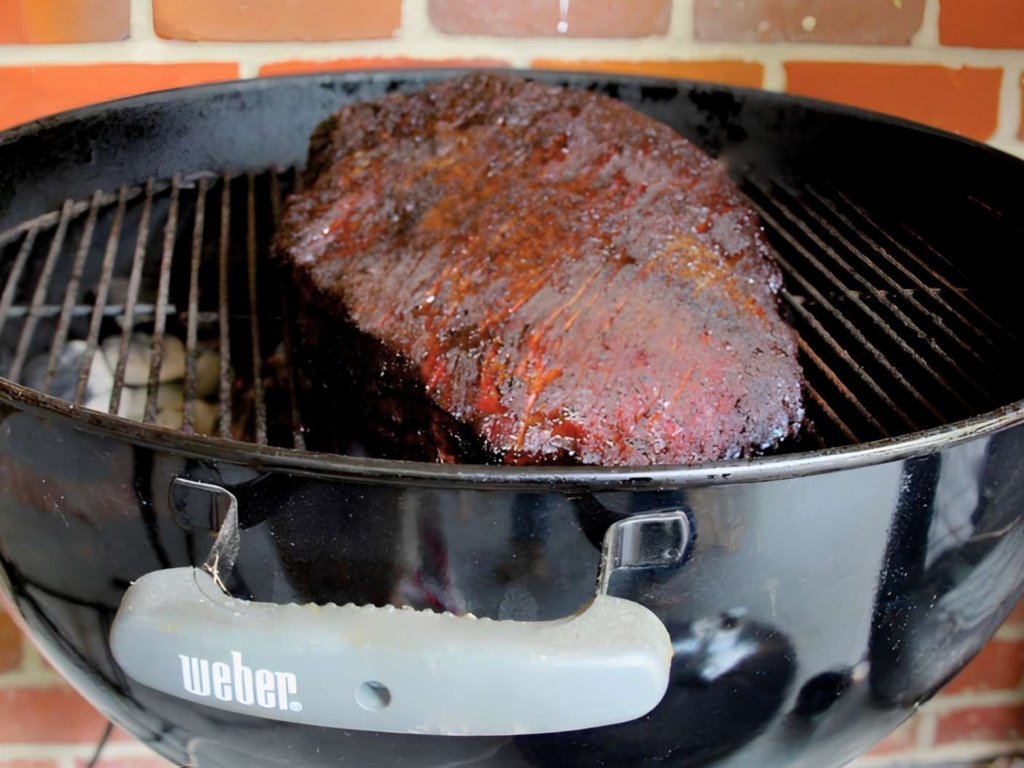
A whole BBQ beef brisket (a.k.a. packer’s cut brisket) is a huge hunk of cow that comes off the smoker deep ebony in color, almost black, looking more like a meteorite than a meal. But it is not burnt, and beneath the crust is the most tender, juicy, meat full of husky, beefy flavor. IF you cook it right. And that’s a BIG IF. Like a Clint Eastwood cowboy, brisket is unforgiving. Cooking it wrong can result in meat as tough as a wrangler’s leather chaps. Now if you are smoking a smaller portion of a whole packer brisket, it can be even more difficult.
That’s why I created a smoked brisket recipe that ensures mouthwatering barbecue brisket every time. Some hot shots may dispute my choices, but if you start here, you can then riff on the options and consider the controversies discussed below. Your effort yields meat that is a bit dry or tough? Then try again. Sometimes it’s the steer, not the brisket recipe or the cook!
Follow this method and your brisket will be tender and juicy, just like the sign says outside of House Park Bar-B-Que in Austin, Need No Teef To Eat My Beef! (Click here to Tweet this bit of wisdom)!

Brisket anatomy
Briskets are the pectoral muscles from the chest of the steer between the forelegs. Each animal has two, and because cattle have no collarbones, these boneless muscles bear quite a load. There isn’t much fat marbling within the muscle, and there’s a lot of springy connective tissue in and around the muscle fibers. That’s why briskets are so tough.
Much of the world’s brisket is made into corned beef, pastrami, or pot roast, but it is also a fine cut for barbecue, and it is required in cooking contests sanctioned by the Kansas City Barbecue Society (KCBS), about 500 across the nation.
The two muscles on a brisket
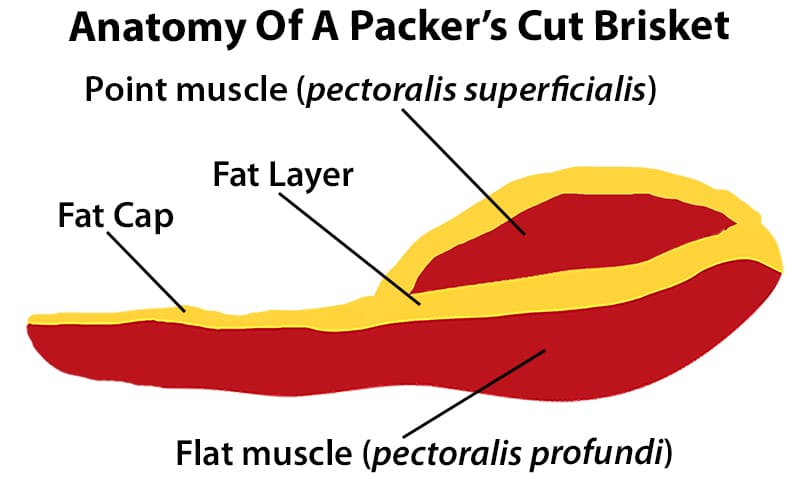
There are two distinct muscles in a brisket that comes from the meat packer whole: a long, flat, rectangular, lean muscle that sometimes comes to a point that is called the flat (pectoralis profundus), and a narrower, thicker, fattier, oval shaped muscle called the point (pectoralis superficialis). Got it? The flat is pointy and the point is oval. Go figure.
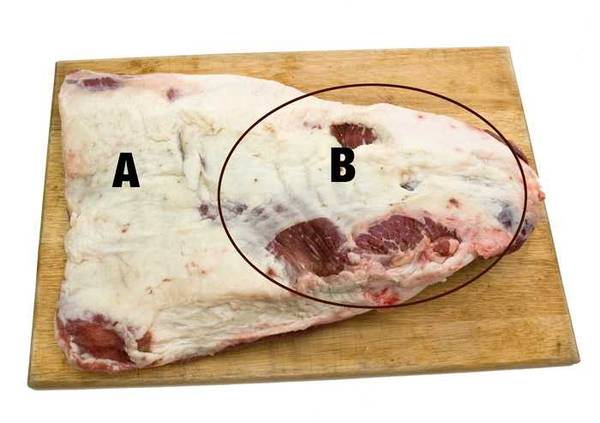
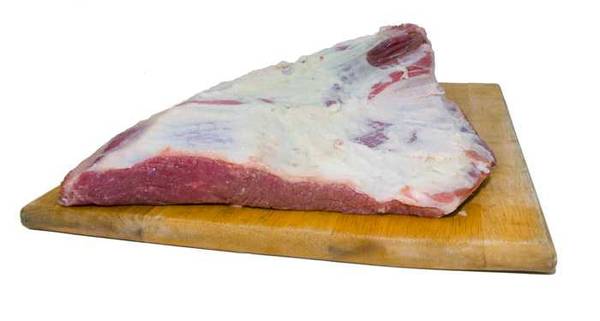
When you buy a whole packer brisket, it usually weighs 8 to 16 pounds (3.6 to 7.2 kg) and comes vacuum packed in an airtight plastic bag. The meat has a cap of fat on one side that can be up to 1″ (2.54cm) thick, and it is trimmed pretty close to fat free on the other side. There is a thick layer of fat that separates the point from the flat. Photos featured here show a whole 12-pound (5.4 kg) packer brisket as it arrived from the packer.
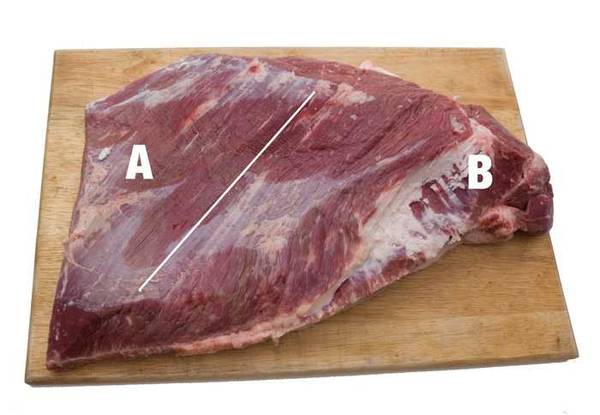
Below, our cutting board is 20″ x 14″ (51cm x 35cm). The fat cap is 1/4″ to 1/2″ (6.5mm x 12.7mm) thick, and the flat is labeled A while the point rests on top of the right side of the flat in the oval marked B. As you can see, the packer trimmed it quickly and left some meat bare. Not the end of the world.
Typical cuts of brisket
Your butcher probably offers three cuts of brisket, a whole packer brisket, a flat (sometimes called “first cut”), and a point (sometimes called “second cut” or the “deckle”). Larger briskets usually come from older steers and tend to be tougher. Most packages will show the “Packing Date.” After a steer is slaughtered, it is broken down and packed, usually within 24 hours, although if it was slaughtered late on Friday, it might not be packed til Monday.
The best briskets are wet aged 28 to 45 days in the vacuum bag. Enzymes within muscles tenderize meat as it ages, so competitors often wet age their meat in the vacuum bag in the fridge in their basement. Click here for more about aging beef.
Cooking a Hunk O’ Flat (HOF) or Hunk O’ Point (HOP)
A whole packer brisket is a lot of meat! Many grocers cut up the whole brisket into smaller more manageable sizes. I often see cuts from the flat or point running anywhere from three to six pounds. I call them a HOF, for Hunk O’ Flat, or HOP for Hunk ‘O Point. These HOFs seem to be more common than HOPs. If the meat case has both, chose the HOP. It has more marbling in the muscle and will be more tender, flavorful, and juicy. Now if you see only flats, ask the butcher if you can order points. HOFs are usually tough and it is hard to make them tender. But don’t ask your butcher for a HOF: that’s just a term you and I use.
My grocer usually has a number of HOFs in the three to four pound range, perfect for serving a small family. If you are cooking a three to four pound HOF, there is much less waste and shrinkage, so buy 1/2 pound (226 g) or more for each person.
The HOF is practically pure muscle and has little marbling, the kind of fat that makes meat taste tender and juicy. Most people who buy the HOF are making pot roast by simmering it for hours in liquid. But you want the Texas taste, right? If you must do a HOF, then try really really hard to get Certified Angus, USDA Choice, USDA Prime, or even Wagyu beef. They have better marbling. Choose a thick HOF, and look for marbling and uniform thickness so one edge won’t dry out. If the meat is not on a plastic tray and you can flex it, select one that is floppy. The technique for cooking a small hunk is pretty much the same as cooking a packer.
Left-handed briskets?
Tom Hoefer from Allen, Texas, posted this tall tale about a barbecue contest on the net in 2001. It is reprinted here, slightly edited, with his permission. Fact or fiction? Serious or joke? You decide…
A few years back at the Texas State Finals, several of us arrived on Thursday to get in line for the best sites. Thursday night was devoted to serious drinking.
One of the better cooks, Ole Connie Baker of the team “Li’l Pit Of Heaven” was throwing back quite a few of those Mexican beers with a chunk of lime stuck in the neck. Connie had so many of them limeade beers that he was starting to smile with a pucker.
Someone asked him how come his brisket was so tender and always placed in the top three. I thought to myself, boy oh boy, if loose lips sink ships then Ole Connie is going down tonight. All got quiet as he stuffed another lime in a longneck and he said that he “only cooks left-handed briskets”.
He explained that most, but not all, steers rest on their left side, which means when they get up they have to push harder with their right legs. At this point about half the bunch mumbled something to the effect of “bull hockey” and went back to different conversations.
A few of us noticed that Ole Connie wasn’t smirking. Two or three of us moved closer and I said to him, “You can’t stop there. What does pushing up with their right legs have to do with the left brisket?”
Ole Connie stuffed another lime and told us that when they push up with the right legs, it flexes the right brisket muscle more than the left. Therefore the right-handed brisket will be tougher and less marbled than the left. Not always but usually. I asked him, “How the heck do you tell a left-handed brisket from the right?”
He stuffed another lime and told me that, with the fat side down, on a left-handed brisket, with the narrow part closest to you, the point will curve to the right.
Saturday awards time rolled around and Connie took First Brisket and Grand Champion over 180 of the best cooks in Texas. I think that I came in 19th with my right-handed brisket.
This is a concept that I just could not get this off my mind. Then I phoned the kin folk in LaGrange, Texas, and asked if they would check out their herd. Yep, you guessed it. Only three out of 37 consistently rested on their right side. Dangnation, Ole Connie has got it going big time!
I went to five different grocery stores and flexed briskets to see which sides were more limber and more marbled. There are some right-handed briskets that are more limber and marbled than the lefties, but for the most part, the majority of the best are left handed!
Welp, there it is folks. Take it or leave it. As Joe Friday on the 1950s TV show, Dragnet, used to say, “Only the facts, ma’am.”
Most smoke brisket recipes include a dose of controversy
As with anything barbecue, there is controversy surrounding brisket. Pitmasters disagree on several major scores:
Meat grade?
Beef is graded based on the age of the animal and the amount of fat marbling. Click here for more about beef grades. The more marbling the better because fat makes the meat taste more tender, flavorful, and juicy. USDA Select, USDA Choice, USDA Prime, and Wagyu are the most common grades, from lowest to highest. Choice or Prime are my favorite grades.
Wagyu is well marbled and will be more juicy, so if you can find it, and afford it, go for it. Most of the top competition teams are now using prime or Wagyu. But it is very expensive. And grade alone will not guarantee that the meat will be tender. Brisket is just an ornery piece of meat, and if you want it tender, you’ve got to work. Tasty is easy. Tender is not.
Trim?
Let’s get this straight: the thick fat cap does not penetrate the meat when it melts. I discuss this myth here. Some cooks like to leave the entire fat cap on the meat as insulation, trimming what remains before serving. This helps moderate the heat during cooking. Others trim most of it off before cooking, leaving a layer of 1/8″ to 1/4″ (3 to 6 mm) , reasoning that if you leave the fat cap on, spices and seasoning will never penetrate to the meat, and then the seasoning is wasted when you trim off the fat at the table.
Some cooks also remove much of the fat layer between the two muscles, the flat and point. I trim the cap to 1/4″ (6 mm) or less. A little fat helps retain some moisture in the meat, after the fat shrinks to about 1/8″ (3 mm) during cooking, most people will not trim it off, so the seasoning remains. Also, while slicing, some of the melted fat will run down across the meat, making it shiny and juicy.
Rub?
Before it is cooked, many of the best Texas barbecue joints simply use “Dalmatian rub” for their authentic Texas brisket recipe: liberal amounts of Morton’s coarse kosher salt and coarsely cracked black pepper. For them, stylin’ is to add some cayenne and garlic powder to the rub. Some leave the rub on the meat overnight in the fridge, but others just season the meat and toss it on the pit. Leaving salt on the meat overnight is a good technique because the salt will start to penetrate. The other spices won’t, but you want that NaCl flavor amplifier down in the meat where it can also help the proteins retain moisture, the basic result of brining.
On the competition circuit, many cooks use a complex secret concoction of herbs and spices that give a little spark to the bark, the flavorful crust that forms after all that cooking. For this smoked brisket recipe, I salt it the night before with 1/2 teaspoon of kosher salt per pound of meat, thicker on the point than the flat. Nxt I apply my Big Bad Beef Rub while the smoker is heating up, about an hour before cooking. This approach is discussed in my article on the Science of Rubs.
Slather?
You can put a rub right on bare meat, or you can help it stick by moistening the meat with a little water, or you can put down a slather of mustard or ketchup, or you can use cooking oil. Our SVP, Clint Cantwell, uses mayonnaise because, as he says “mayo is fat, and fat is flavor!”
Don’t get too bogged down in this detail. My experience is that slathers make little or no difference in the final outcome so I tend to skip it with my smoked brisket recipe. Mustard is water, vinegar, and maybe white wine with mustard powder mixed in. The amount of mustard powder is so small that by the time the water steams off and drips away, the mustard powder remaining is miniscule. If you want a mustard flavor, you will do much better by simply sprinkling mustard powder on the meat. I usually use water because spice rubs dissolve better in water than oil. Far more important than what’s under the rub is what is in the rub itself. So use whatever liquid or fat you want for a slather.
Pump?
Countless competition cooks like to inject brisket with an internal marinade by using large hypodermics and other gimcracks. These “pumps” add moisture, break down tough fibers, and add flavor. Many of the champs have been injecting the meat with a product called Fab B Light or Butcher BBQ Brisket Marinade, both of which are moisturizers, tenderizers, and flavor enhancers.
Fab B contains hydrolyzed soy protein, vegetable oil, sodium phosphates, monosodium glutamate, autolyzed yeast extract, xanthan gum, disodium inosinate, and guanylate. Butcher BBQ products contain hydrolyzed vegetable protein (hydrolyzed soy and corn protein and salt, with partially hydrogenated vegetable oil [cottonseed, soybean] added), monosodium glutamate, sodium phosphate, and xanthan gum.
Some traditionalists think this is way too Barry Bonds and are repulsed by the idea. The results speak for themselves. They are winning. A lot. If you choose to inject and don’t want all the chemicals, don’t use anything that tastes very different from beef. Just use plain beef broth. In most recipes, I specify low sodium broth, but actually the saltier version is better in this case. This is like brining, and the salt helps retain moisture as well as enhance flavor. Insert the needle parallel to the grain so it doesn’t leave tracks in the finished meat. If you inject salt, however, do not dry brine.
Click here for more on injecting and injectors.
Fat cap up or down, on or off?
This argument is as old as Texas. I asked my beef consultant, Dr. Antonio Mata, a meat scientist and a former Consulting Technical Coordinator to the National Cattlemen’s Beef Association, if fat will melt and penetrate the muscle fibers. His reply was simple and unequivocal. “No way.” I asked him to elaborate. “The fibers are packed too close for large fat molecules to squeeze in. Since about 75% of the muscle is made of water, and oil and water don’t mix, it is just going to melt and run off.” Click here for more on the subject of fat caps.
This melting of fat is called rendering. We know that rendered fat can run over bare muscle, basting it, but very little will go to the underside of the meat. Most of it will just run down the sides and drip off. So the only basting occurs on the sides. We know that:
- All the fat does not render during cooking;
- Rub applied to a thick fat cap will not contact the meat because the fat is a barrier. If the fat cap is very thin, some spices might get through;
- Warm fat with spice rub is yummy;
- Fat can inhibit moisture loss from evaporation, and since the stall is caused by evaporation, a fat cap can slow the onset of the stall and help you speed through it;
- Bark will not form on fat because bark is mostly dried surface meat;
- When cooking with heat directly below, as with a Weber Smokey Mountain or a kamado, the fat can absorb heat and protect meat from drying out;
- Diet conscious diners will trim off thick layers of fat if the meat is served on a plate and not on a sandwich. That means the flavorful rub will be removed;
- When cooking two meats, one above the other, the fat can drip down and baste the meat below;
- Beans that sit below melting fat are magical; and
- That a small fat cap will run down over the meat as it is cut, adding flavor.
So what’s the right thing to do? In this smoked brisket recipe I say trim most of the fat but leave a thin layer, less than 1/4″(3 mm), so that diners will not remove it and the rub. I put the fat between the heat and the meat, often with beans underneath. Sometimes I even flip the meat midway through the cook just so nobody can win the argument.
Separate the two muscles?
There is a lot of sense in separating the two muscles. When they are together a packer is tear-drop shaped and so the thin end cooks faster than the thick end and tends to dry out. If you separate the two muscles they are more uniform in thickness.
Some cooks remove the point layer by working a knife through the fat layer that runs between the flat and point. They cook both muscles side by side rather than one on top of the other. Since the flat is a pretty evenly thick, it cooks more evenly with only a little bit on the ends overcooking. You can chop the overcooked parts and mix them with sauce for chopped brisket sandwiches, fajitas, mixed with beans, etc. By cooking the flat separately, you get beautiful symmetrical sandwich slices with a smoke ring all around them.
The point end is usually a bit thinner, but more marbled. Depending on thickness you might want to put it on an hour or two after the flat.
Separating the muscles also doubles the surface area and creates more bark. It speeds up cooking, knocking off about 1/3 of the time for cooking a whole packer. If you separate the muscles and remove most of the fat from on a 13 pound (5.8 kg) packer, you can expect about 5 pounds (2.2 kg) of flat, 4 pounds (1.8 kg) of point, and 4 pounds (1.8 kg) of trim.
Cooking temp?
Many competitors swear that low and slow, around 225°F (107°C) for 18 to 20 hours for a whole packer, is necessary to make the meat tender and juicy. Legendary “Barbecue King” Walter Jetton, Lyndon Johnson’s caterer, advocated cooking brisket at 275°F (135°C) and up. John Fullilove of Smitty’s Market confesses that he cranks the heat over 300°F (149°C) and knocks out his briskets in as little as 8 hours.
I have seen competitors take home big prize checks with brisket cooked at 350°F (167°C). The bottom line is that cooking temp seems to be less important than other factors. But because it is difficult to make brisket tender, I advocate for low and slow until you have mastered the techniques and are certain that your meat source and methods are superior. I cook at 225°F (107°C) for this smoked brisket recipe.
Mop?
A lot of cooks like to keep their meat wet by mopping it with a baste. They say the mop replaces moisture that evaporates. Others say mops cool the meat and slow the cooking. The AmazingRibs.com science advisor, Prof. Greg Blonder has proven that wet meat holds more smoke, so mopping or spritzing with water, beef broth, or apple juice will yield a smokier brisket. It also cools the meat and slows cooking, which allows more time for connective tissues to melt. Mopping with flavored liquids has no significant impact on taste. There just aren’t enough taste molecules in apple juice or beer to change the taste of brisket. Not like a sprinkle of a spice. Click here to read my article on basting.
Crutch?
The Texas Crutch is a technique for speeding the cooking and moisturizing the meat. The concept is that you smoke for a few hours, and when the meat hits about 150°F (65°C), wrap it tightly in heavy-duty foil or untreated butcher paper (never plastic wrap) and let it braise and steam in its own juices in the crutch in the cooker. Some folks wrap at 150°F (65°C), others at whatever temp the meat is at when the stall kicks in, others when the color looks right to them.
If you don’t wrap, when the meat hits about 150°F (65°C), moisture rises to the surface and cools the meat by evaporation, like sweat on an athlete. The meat then sits there stuck at an internal temp of 150 to 160°F (65 to 71°C) for up to 5 hours. This stall is a maddening point in the process when it seems like something is wrong. Its temperature just doesn’t rise for hours at a time. This is freaky and a lot of novices panic when it happens. Many people think that melting fat or collagen cause the stall. It is not. Evaporative cooling causes the stall. Click here to learn more about the stall.
The negatives of the crutch
The down side of wrapping is that the foil softens the crusty bark. You can overcome that by placing the meat over high heat for about 10 minutes per side just before slicing. I think wrapping in foil and holding in a faux cambro is essential for tender, juicy brisket. Brisket is the only meat I crutch. In competitions, virtually all the teams crutch their brisket as well as pork shoulder and ribs. I think the impact of wrapping is major on brisket, minor on the other meats. But you do not absolutely need to crutch. If you don’t, you’ll end up with a firmer crust, but you risk slightly drier and tougher meat.
Purists say wrapping is not traditional. Spare me. Cooking with charcoal in a steel tube is not traditional either. You want tradition? Go dig a pit in the dirt.
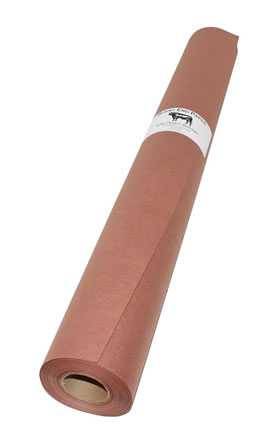
The next controversy over the crutch is whether you should wrap in butcher paper or foil. Brisket master Aaron Franklin of Franklin Barbecue in Austin uses untreated pink butcher paper like this. Click here to order some from Amazon if you want to try it.
My experience is that without wrapping you get the best bark, most smoke, and most intense flavors. Wrapping in foil makes moister meat with a hint of pot roast and a soft bark, but it can cut 2 hours off the cooking time. Wrapping in paper cuts about 1 hour off cooking time, lets some moisture escape but traps most of the rendered fat, and tastes very much like the foil wrapped version. Bottom line, the differences are very subtle. And fears of destroying the bark are overblown. If you have a good bark when you wrap, most of it will survive.
How do you tell when brisket is done?
Steaks from along the back of the animal are done at 130 to 135°F (54° to 57°C), at which point they are the most tender and juicy. But that muscle is more tender and juicy because it doesn’t get much of a workout on the animal. The brisket, the pectorals, get a much bigger workout and have a lot more tough connective tissue that needs to be softened. So you just can’t take briskets off the heat at the same temp as steaks. For more on this conundrum, read my article on meat science.
Old time pitmasters say brisket is done when it is done. These folks say you really can’t tell by temperature. Each brisket is different. They can tell when it is ready by feel. Some talk about a gelatinous bounce it has when they poke it because the connective tissues have melted. This is referred to as the “wabba wabba” point. Others stick a fork in the side of the flat and twist. If it turns easily, it is ready. Yes, that’s where the expression “stick a fork in it” came from. “Fast Eddy” Maurin says he waits until it is “as soft as buttah.”
The rest of us have to rely on temperature, and despite their bravado, the top pitmasters on the competition circuit all use digital thermometers to help them. A lot will depend on the quality of the meat, how moist the air is in the cooker, if you injected, and how long you crutched. I’ve heard skilled cooks tell me every number from 195 to 205°F (90° to 96°C). A lot of top competitors swear by 203°F (95°C), and I have noticed that something magical does seem to happen at around this number. At this temp, the thermometer probe glides in effortlessly, like buttah (once it gets through the bark). If, despite your efforts, your brisket never gets tender, pull it off before it goes above 205°F (96°C) because it will only continue to dry out.
Holding?
Then it comes off the cooker and it gets wrapped in foil and sits in a faux cambro, an insulated box like a beer cooler, for 1 to 4 hours. Holding helps tenderize by allowing some carryover cooking which helps melt tough connective tissue. The foil also captures natural jus for use in a sauce, and holding the meat allows the surface parts that have dried out during cooking to re-absorb some of the juices. This is not the same as resting a steak or other meats, I do not recommend resting meat. Holding is also a great fudge factor that lets you take the meat off when it is ready and hold it for a few hours until the guests are ready.
Slicing?
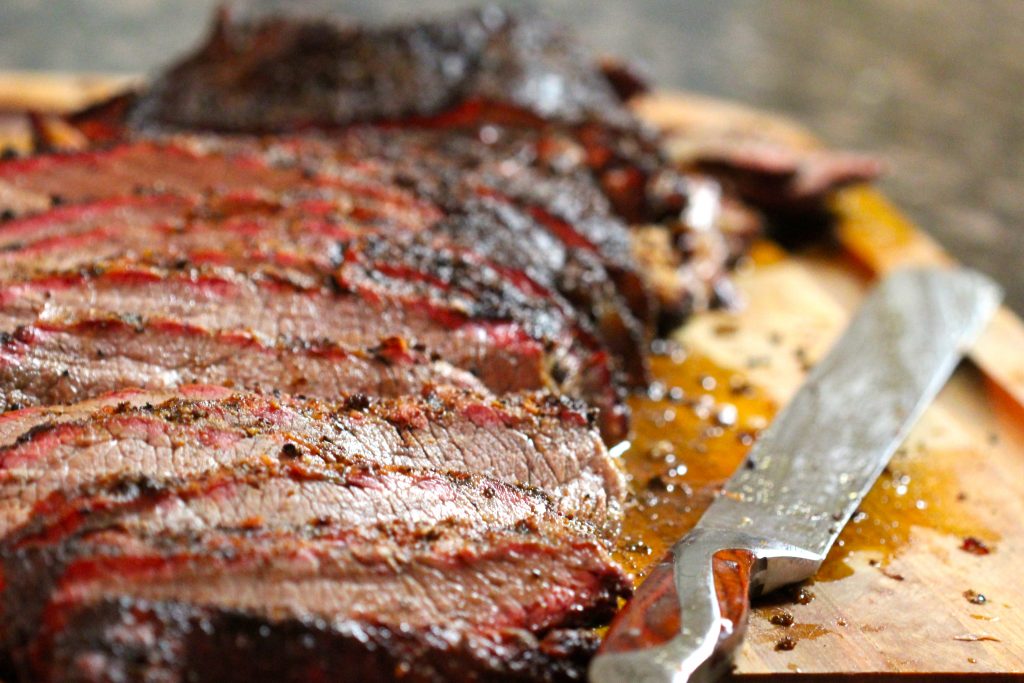
Controversy also reigns over slicing. The target temp used by many pitmasters is about 140°F (60°C) before they slice. Once it’s ready to slice, brisket is easier to chew if you cut it perpendicular to the grain. If you cut with the grain, it can taste stringy and chewy. You’ve come this far, so make sure you slice brisket correctly!
The problem is that there are two muscles, the flat and the point, and the grains run in different directions on them. Most folks slice from the thicker, point end in about 1/8″ to 1/4″ (3 to 6 mm) thick slices. Some folks run a knife through the fat layer between the point and flat, separating them, and then slice each separately.
Meanwhile, other folks cut off the flat where the point meets it, and then they rotate it so the cut is on the side and they slice through the point and flat from the side. That’s the way I like to do it.
Sauce?
To some people, it’s not barbecue unless it has a sweet red sauce on it. Not to Texans. “In Texas, we celebrate great brisket by not messing with it,” says Daniel Vaughn, the barbecue critic for Texas Monthly. “If it’s done right, then you slice it pencil thick and slap it on a piece of butcher paper. It’s naked, quivering and vulnerable, so it has to stand on its own.” In some places, a thin decidedly not-sweet, tomato-y gravy-like jus is tolerated.
Competition brisket
Competition teams go to extremes to make brisket look pretty and to make the one bite taken by the judges taste extraordinary. Check out the Award Winning Competition Brisket Recipe from American Royal champs Clark Crew BBQ.
Cooking more than one
People frequently ask me how to handle cooking two briskets (or more) or a shoulder and a brisket, or a shoulder, brisket, ribs, and a muskrat. The answer is here, in my article on Cooking More Than One Large Hunk ‘O Meat.
Sides
Beef brisket achieves its apogee on the blackened pulley pits of Central Texas, so I always serve it Texas style. The smoky slices of meat from this smoked brisket recipe lounge on a thick slab of Texas Toast with only a few spoons of thin, tart, tomato-soup like sauce, none of that thick sweet Kansas City stuff. Brisket needs sugar like steers need wolves click here to Tweet this bit of wisdom.
On the side, I like to honor the Mexican heritage of Texan cuisine with frijoles, simple pinto beans cooked cowboy style with some fatback or bacon, onion, garlic, and a few chopped tomatoes, scented with bay leaves and cumin, and sprinkled with fresh minced jalapeño. Absolutely positively none of those sweet Yankee beans. The wolf law holds for beef sides too.
Then, honoring the European heritage of many of the great Texas barbecue joints surrounding Austin, I want a mound of German Potato Salad, warm and pungent with vinegar and dotted with celery seed.
Next to it I want a scoop of fresh, crunchy sauerkraut from the fridge. None of that soggy canned stuff.
To honor the Czech heritage of the numerous Texas butcher shops turned barbecue joints, I chase the whole thing with a tallboy, a simple uncomplicated Pilsner style Texas brew, straight from the bottle.
Dessert has to be crunchy, gooey pecan pie with black coffee. Pecans are a major cash crop of the Lone Star State, and my favorite pie bar none.
Cook today, serve tomorrow
I often get asked what’s the best way to cook brisket Saturday and serve it on Sunday. My answer is “don’t do it”. That’s called serving leftovers.
These meats are best fresh off the smoker. If you have to serve it at noon on Sunday, then start cooking before you go to bed.
If you don’t want to cook this smoked brisket recipe overnight then consider serving something that doesn’t take so long, like smoked turkey or baby back ribs.
Now if you absolutely positively must cook it Saturday to serve Sunday, there is a technique I describe in this article.
What to do with brisket leftovers
If you do have leftovers from this Texas style smoked brisket recipe that you will not be able to scarf down in a few days, mix the leftovers with a bit of barbecue sauce or the jus from the Texas Crutch (if it is not too salty), and freeze everything in zipper bags or vacuum bags. The sauce helps prevents freezer burn. Pop a bag in the microwave and you’ve got a great emergency meal for two.
Leftovers from my smoked brisket recipe are best reheated in the microwave a small amount at a time. But it will be a bit drier and tougher than the first day, so bring it back to life with a splash of water, apple juice, Texas Crutch jus, or barbecue sauce. The best method is in the microwave, second best is to heat it slowly in a pot with the lid on.
Here are some other ideas for leftover brisket:
- Shepherd’s Pie and Cottage Pie. Probably the best thing I’ve ever done with leftover meat from my smoked brisket recipe is a variation on Shepherd’s Pie or Cottage Pie. This classic peasant casserole was a hearty meal for farmers, often served midday. There are hundreds of variations on the theme, but it is essentially meat and potatoes in two layers. They are often found in Irish and English restaurants in the US. Here’s the core concept: Brown veggies and cubes of beef in a deep pan or casserole. Whup up some mashed potatoes, and pile them on top. Put them in the oven and bake.
- So here’s what I did: On Sunday I did brisket and garlic mashed spuds. I browned carrots, celery, onion, and frozen peas, and then tossed in cubes of leftover brisket, some of the jus that was in the foil when I did my Texas Crutch (not too much, it’s strong stuff), and some beef stock leftover from the last time I did a Prime Rib (any beef broth will do). I topped them with about 2″ (5 cm) of leftover garlic mashed, painted the top with butter, sprinkled on some parmesan cheese and bread crumbs, and baked the whole shootin’ match in the oven until the top was brown. OMG. Substitute BBQ lamb and you’ve got Shepherd’s Pie.
- Brisket enchiladas. Slow’s Bar-B-Q in Detroit is famous for their brisket enchiladas. Folks make the enchiladas by sautéing onions, tossing in some sliced brisket and a splash of hot sauce, Worcestershire sauce, and their house secret sauce. They then dump it on a tortilla, top it with grated smoked gouda cheese, roll it up, grate some American cheese on top, and give it a squirt of hot sauce for good measure.
- Stir fry. Believe it or not, leftover brisket is great in a Chinese stir-fry with onions, carrots, broccoli, and a soy/sesame oil/hoisin sauce with a splash of hot sauce on a bed of rice.
- Hash. John R. Crowley from Denver (a member of our Pitmaster Club, where many brilliant BBQ ideas are shared) says he likes to chop up leftovers, mix them in beans, or fry them up in some hash.
- On scrambled eggs or salads. Bill Martin likes his leftovers chopped up in scrambled eggs and on top of a salad.
- Sandwiches. Seve Page says “To me there is not much better than a long slice of brisket with mozzarella (or provolone) on a steak roll bun. I microwave gently with some crutch sauce, place on the bottom half of the bun with two thick slices of cheese end-to-end on top and pop into a small toaster oven in the broil mode to melt the cheese and toast the bun (so it doesn’t get soggy). I then drizzle the crutch sauce on the top toasted bun and slap ’em together.”
- Italian beef sandwiches. Lucy Baker says “Make Italian beef-style sandwiches with very cooked (limp) green and red bell peppers, onion, and a little Italian seasoning. Reheat the beef in broth and spoon over crusty bread before adding the beef and peppers. Yikes!”
- Quesadillas. Merrill Powers in Elmhurst, Illinois, makes quesadillas with his leftovers.
- Chili. Dave Frary makes chili with his leftovers.
- Burritos. Danny Gaulden makes burritos.
- I don’t know what to call this but I want to eat it. Rodney Leist from Elfrida, Arizona, kills several different leftovers in one dish. He puts one of those single serving bags of corn chips in a bowl, adds a big scoop of leftover chopped brisket, a similar amount of leftover smoked sausage, and a similar amount of beans. On goes some leftover sauce, chopped onions, chopped jalapeños, and grated cheese. The whole thing gets heated in the microwave. Sort of like a walking taco but in a bowl!
- Trade bait. Buzz Dean in Wisconsin says he takes his leftovers to the pub and trades them for beer!
At a glance: Secrets of success with this smoked beef brisket recipe
1) How do I pick the right brisket? Do not just pick up whatever your butcher has on display. Get USDA Choice grade meat or higher. If you have to special order it, then order it. If you start with USDA Select or below, you will have a hard time elevating it beyond shoe leather.
2) How do I know when brisket is done? Use a good digital thermometer to monitor your cooker and another to monitor the meat. Your smoker’s dial thermometer is wrong. Don’t trust it. The Maverick remote is perfect for this job. Step into the digital age. As a general rule of thumb, aim for a finished temperature of between 195°F and 205°F, though seasoned professional go by feel versus temperature as each brisket cooks differently.
3) What size brisket should I buy? Use a whole packer if you can. Small pieces, like a four pound hunk o’ flat (HOF) or hunk o’ point (HOP) lose a lot of moisture, shrink a lot, and get tough.
4) Should I separate the two muscles of a packer? This topic in a Texas bar will usually end in gunplay. Lately, I have been doing it and I like the results.
5) Should I inject a brisket? Injecting with beef broth, brine, or specially formulated injection helps combat dehydration, and the salt enhances flavor.
6) Why has the temperature of my brisket stopped rising, and why should I wrap the brisket? Wrap the meat in foil or butcher paper when it hits 150°F (65°C) internal temp. The method tenderizes and moisturizes, but most importantly it powers through the stall, a long delay during which the meat temp stops rising. The stall can last for up to 5 hours. Many people think the stall is caused by melting fat or collagen. It is not. This is caused by the meat sweating and cooling from evaporation. Wrapping the meat powers through the stall and delivers moister meat. Click here to learn more about the stall.
7) Can I cook brisket in the oven? True BBQ brisket is smoked low and slow on a smoker or grill, so skip the oven if you can and opt for this authentic smoked brisket recipe. Finishing indoors after it has absorbed plenty of smoky flavor is cheating, but nobody will arrest you. If you’re having trouble controlling the temperature of your outdoor cooker, and most charcoal cookers are hard to control for long sessions, cook outdoors until the meat hits 150°F (65°C), wrap it in foil, and then move it indoors. It still may stall for an hour or 2 at about 170°F (77°C). Wait it out.
8) How do I keep brisket warm after cooking? When the meat in this smoked brisket recipe hits an internal temperature of 200 or 205°F (83 or 96°C) in the flat, hold the wrapped brisket in a 170°F (77°C) oven or wrap it with towels or a blanket and let it rest in a beer cooler for 2 to 3 hours. The internal temp slowly drops. This helps tenderize the meat but also gives you leeway before serving if the cooking takes longer than anticipated.
9) When should I start cooking a brisket? When it comes to this smoked brisket recipe, start earlier than you think you should. If the meat is ready before the guests, fine. It will be stay moist and juicy wrapped in foil in a beer cooler or a holding oven. Better the meat should wait than the guests. Exact timing is impossible to predict.
10) How long does this smoked brisket recipe take? The most important determinants of total cooking time for a smoked brisket recipe are how thick the meat is and what temp your cooker is averaging. But humidity, ambient air temp, wind, rain, and grade of meat can all play a role. Click here for more about what determines cooking time. There is no precise formula. That said, plan on 12 to 18 hours for a whole packer brisket if you wrap it in foil at 150°F (65°C), plus two hours holding time. If you don’t wrap in foil, 16 to 20 hours plus two hours rest is a good estimate. For flats, 10 to 12 hours with foil, 12 to 14 hours without foil.
“I adapted your brisket rub recipe this summer and my customers love it (8,000 pounds served in the past 6 months)! My brisket even won ‘best beef’ in the Sonoma County Harvest Fair this year (2010).” Larry Vito of BBQ Smokehouse in Sebastapol, CA
Up your game: Join our Pitmaster Club. Try it out for free for 30 days. No credit card is needed. No spam. Join now and Be Amazing!


Authentic Texas-Style Smoked BBQ Brisket
Makes
1 killer brisketSpecial Tools
Ingredients
Method
- Trim. Trim off most of the fat cap but leave about 1/4" (6.3 mm). Clean the meaty side of any silverskin, a shiny, thin, tough membrane. Set aside some fat for making burnt ends if you're going that route. I always freeze some of the fat and grind it for my burgers. I also render beef fat in a saucepan, and freeze that too. I use beef fat to paint my steaks with fat just before searing. If you want to separate the point and the flat muscles before cooking, now's the time to do it (see Notes).
- Season. Sprinkle 1/2 teaspoon Morton's coarse kosher salt per pound of meat evenly over the surface. Do this about 12 to 24 hours in advance, or at least 2 to 4 hours before you put it on the smoker. Notice the direction of the meat grain so you can slice across the grain when the brisket is done. After salting, sprinkle Big Bad Beef Rub liberally on all areas of the meat and rub it in. Keep the meat chilled until just before you cook it. Chilled meat attracts more smoke.
- Fire up. Preheat your smoker, or if you are using a grill, set it up for indirect cooking. Click here to see how to set up a gas grill, here for how to set up a charcoal grill, or here for how to set up a bullet smoker like the Weber Smokey Mountain. Get the cooker temp stabilized at about 235°F (113°C). We want to cook at about 225°F (107°C), but the temp will drop a bit once you open the lid and load in the cold meat.
- Cook. Put the meat on the cooker. I strongly recommend you use a remote digital thermometer and insert the probe with the tip centered in the thickest part of the meat furthest from the heat. On a smoker with a water pan, put the meat right above the water. Place the oven temp probe on the grate next to the meat. Add about 2 cups (4 ounces (113 g) of smoking wood right after the meat goes on. When the smoke stops, add 4 ounces more during the first 2 hours, which usually means adding some every 30 minutes or so. Keep an eye on the water in the pan. Don't let it dry out. After 3 hours, turn the meat over if the color is different from top to bottom. Otherwise, leave the meat alone.
- Wrap. The Texas Crutch is optional but I always crutch brisket. It helps beat the BBQ stall. When the brisket bark is set and the internal temp stops rising, at an internal temp of about 150°F to 165°F (after about 6 to 8 hours), put the brisket on a long sheet of double-layered heavy-duty foil or butcher paper, drizzle on 1/2 cup beef broth, and wrap the brisket, crimping and folding tightly around the meat. Then continue cooking it wrapped at 225°F (either on the smoker or in an oven).
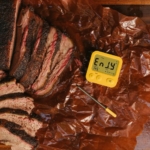
- Hold it. When the meat temp hits 195°F (95°C), after another 5 to 7 hours, start poking it. When it is done, a thermometer probe will slide in and out with little resistance. Poke it with a finger or pick it up and jiggle it. If it goes "wubba wubba" and wiggles like jelly, it is done. This usually happens at around 203°F (95°C). At that point, hold the wrapped brisket in a faux cambro (plastic cooler) for 2 to 4 hours.
- Slice. Wait to slice until the last possible minute. Brisket dries out very quickly when cut. Turn the meat fat side up so the juices will run onto the meat as you slice. The easy way is to lop off about 1" (2 cm) from the thick end and about 2" (5 cm) from the thin end, which is the tip of the flat. These ends are likely overcooked and dry. Chop them and smother them in sauce for chopped brisket. Then find the fat layer between the point and flat and slide your blade between the two muscles. Separate them, and trim off most of the excess fat. Find the grain of the flat and cut across the grain into slices 1/8″ to 1/4″ (3 to 6 mm) thick, or about as thick as a pencil. You can also slice against the grain of the point, and offer your guests "lean" (flat) or "fatty" (point). Most will choose the lean, which will leave the better, fattier, point cut for you. Turn it into burnt ends!
- Serve. If the brisket is perfectly cooked, it should be moist and juicy. You can serve it simply sliced on a plate or as a sandwich made with Texas Toast. If you want to drizzle on the juices, taste them first: they can be salty. In that case, you can dilute them with water or unsalted beef broth. You can also mix them with some Texas Barbecue Mop Sauce.
 Sign up for a free trial of the AmazingRibs.com Pitmaster Club and experience everything that the world's largest membership-based BBQ and grilling community has to offer!
Before you can post a comment or question you must sign into our commenting partner, Disqus. This helps make sure everyone hanging around the grill is civil. We do not tolerate nastiness, racism, porn, inappropriate language, or attacks on others. All comments are the property of AmazingRibs.com and we reserve the right to quote them, edit them, delete them, and block people from making future comments.
Please leave comments and questions on the same page that is devoted to that subject so others can see questions and our answers when they are reading about the subject. You must enable JavaScript to use the comments section, and you must accept cookies to post comments. Note: the software that runs Disqus is different from the Pitmaster Club, so members need to sign into the Pitmaster Club separately.