


Getting to know your grill, including potential hot spots and how temperatures react to various variables like airflow and waterpans, is key to producing great food.
Remember, when you close the lid, your grill or smoker is just an oven. The main difference between an outdoor oven and an indoor oven is that most grills do not have thermostat control, they are not well insulated, and their cooking temps are influenced by sun, wind, rain, and, at my house, snow. The other big difference is that everything tastes better on the grill. In order to take advantage of the great flavor the grill imparts, you need to control the temp, and you need to know what the temp is at the cooking surface all times. Just like indoors.
The first step to becoming a great outdoor cook is to master your instrument, and the best way to do this is to calibrate it with dry runs. No food needed.
The goal is to give you a feel for how your cooker responds to you, but most importantly, how to hit target temps in recipes. Foods, especially meats, are complex chemical concoctions, and their chemistry changes with temp. Read my article on meat science for more on the subject. Because the 2-zone setup is a technique the best outdoor cooks use to cook most everything (it prevents burning, provides a safe zone, produces even temps in the center of thick cuts), it is very important that you click the red link and read my article on the subject, and conduct all tests by setting up for 2-zone cooking.
Target temps and how to get there
You want to know how to get the air temp in the indirect zone of your cooker to three important numbers: 225°F, 325°F, and Warp 10. Almost all my recipes call for one of these three temps.
225°F. At 225°F you are cooking low and slow, at a temperature that muscle fibers don’t seize up and squeeze out all the juices, perfect for tough cuts of meat like ribs and pork shoulder. At 225°F on the surface, water will evaporate slowly and help form the crust or bark. On large cuts, there is a point at which evaporation cools the meat so that it cannot rise until the surface dries, called the “stall“. The stall can last for hours during which collagens and fat melt making the meat more tender and juicy.
325°F. At 325°F you are cooking hot enough for the Maillard reaction to have time to brown the surface proteins. It is also hot enough to render fats and crisp poultry skins and to overcome the stall rapidly.
Warp 10. This is the top end. Pedal to the metal. Give ‘er all she’s got Scottie. You want to know what Warp 10 is because you will want high heat for searing the surface of steaks, sizzling on sauce, and for grilling pizza.
Here’s how to calibrate: Fire up your cooker, make adjustments that will change the temp one variable at a time, and take notes with a cooking log. Click the link to download the one I use.

You are doing experimental research here so it is important to apply a vital rule in the scientific method: Change only one variable at a time and you will learn something factual. Just adjust one vent at a time. Playing with both vents at once, for example, is like trying to control the speed of your car by using both the gas pedal and the brake at the same time. Don’t add coal and adjust vents. Just do one or the other. Click here to learn more about controlling temperature with vents.
On a gas grill start with one burner on low, then move up to medium, then high. Then add a second burner, etc.
You absolutely positively need a good oven thermometer to calibrate and for when you cook. It is foolhardy machismo to think you can guesstimate the temp by holding your hand over the grill. Everybody’s sensitivity to heat is different, and because heat dissipates rapidly as you move away from the source, just moving your hand up or down a few inches can make a major difference.
The thermometer probe needs to be at the grate level where the food is, not in the lid. There can be a big temp diff. Get a digital. It is far more accurate than a dial thermometer which can be off by as much as 50°F. Please read my Buying Guide to Thermometers.
Check the weather
It is also important to know that weather plays an important role. Cold air coming in through the combustion air vents can cool the coals or gas jets so you will need more fuel to get to your target temp. Hot air will have the opposite effect.
Maintaining a temp also depends a lot on the ability of your cooker to retain heat. A Weber Kettle is thin metal and has much less heat holding capacity than a Big Green Egg that is made from thick ceramic. Wind and rain really cool the exterior of a thin walled cooker and can wreak havoc on your plans.
Wind can also blow out a flame on a gas cooker, and if you’re not paying attention, it might sit there, flame out, pumping gas into the cooking chamber for an hour. If you then discover the problem and hit the igniter, you will spend the night in the burn unit.
Dry runs for gas grills

1) Read my article on 2-zone setups. Turn one burner on high and leave the others off. Put the thermometer probe above the hot burner and close the lid. When the temp stabilizes, write down the temp and how long it took to stabilize. Then move the probe above the cold burner furthest away and record the temp. If you have three or more burners, add one burner at a time and take measurements at different dial settings. Keep fiddling until you figure out how to get to 225°F and 325°F on the indirect side. Measure the temp on the upper grate too.
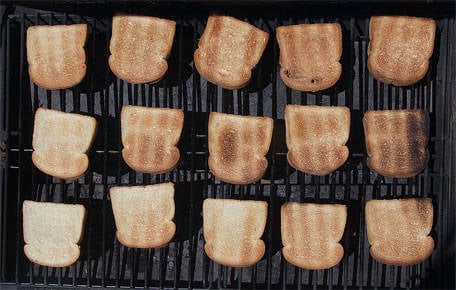
2) Now check for hotspots. On a piece of paper draw the cooking surface of your grill, roughly to scale. Divide it into quadrants by drawing a line down the middle of both sides. Buy a loaf of white bread. Turn all burners to medium, close the lid, and let the temperature stabilize. After about 15 minutes place the bread on the grill in a grid, with about 1 or 2″ between them. Move quickly or have someone help you. Close the lid and don’t open it unless you smell burning. Open the lid and quickly flip them. You will see that your grill has some hotspots. Take a picture and print it for future reference. Finish toasting the bread, make some sausage gravy, and chow down.
3) Repeat the tests with a water pan as described in my article on the best setup for a gas grill. A water pan above the burners is a great way to stabilize heat and add humidity to the oven. Humidity alters heat transfer, dehydration of the food, and mixes with combustion gases and improves the flavor. If you have a gas grill with only one burner, you need to master this setup. But you should really consider upgrading to a multiburner grill. It gives you much more versatility.
Dry runs for charcoal grills
The first thing to do is close your eyes and say, “I am smarter than my grill. I will not let it ruin meals and make me look like a fool or make my family sick.”
Most charcoal and wood grills and smokers have two oxygen controls:
The intake damper is near the charcoal or wood and its job is to provide them with oxygen. The intake damper is the engine that drives the system. Close it off and you starve the fire, and it burns out even if the exhaust damper is open. Open it all the way and the temperature rises. On most grills and pits, you control temperature mainly by controlling the intake damper.
The exhaust damper (a.k.a. flue, vent, or chimney) has two jobs: (1) Allow the combustion gases, heat, and smoke to escape, and (2) pull oxygen in through the intake damper. The exhaust damper needs to be at least partially open at all times in order to keep combustion gases from smothering the fire like a wet blanket of CO, CO2, and other combustion products. The exhaust damper also controls oxygen entering the intake damper. As heat, combustion gases, and smoke exit the chimney, they create low pressure inside the cooker and that pulls in oxygen through the intake vent.
The quantity of charcoal is another way to control temperature. Buy one brand of charcoal briquets and use it for all your dry runs. Lump is too irregular from batch to batch (read my article about charcoal). Get rid of this variable. Use a chimney to light your coals and fill it to the same level each time. Each individual briquet represents a measurable quantity of energy. Start with fully lit coals covered in gray ash. They are at their peak temperature then, and their temperature is stable, although they slowly decline in temperature as they are consumed by combustion. It will take about 15 minutes, so don’t dump the coals into the grill until 20 minutes after you have lit them. Repeat these steps exactly for each test.
1) Set up for 2-zone or indirect cooking. That means you will dump all the coals on one half the grill and none on the other half. The side with coals is the direct heat side, the side without the coals is the indirect heat side. Open all dampers all the way. On a kamado, use the deflection plate, usually an optional add-on that is essential. Often made of ceramic, like a thick pizza stone, it sits between the coals and the food. Click here to learn more about how to control temperature on charcoal grills and smokers.
2) Put the thermometer probe in the middle of the cooking grate in the indirect zone. Measure the distance from the edge where you placed the probe so you can put it in the exact same location on repeat tests. Write it down. Put the lid on. On a Weber kettle place the damper over the indirect side. Wait for the temperature to stabilize by watching the thermometer, about 5 minutes on a simple metal grill, longer on a kamado. Take a reading and write it down. Now try to control the heat by controlling the oxygen reaching the coals, and that means controlling the intake vents only. Leave the exhaust vent open all the way unless you can’t get the temperature down. Make a note of how long it takes to stabilize. Now try to get to 325°F and 225°F.
3) Move the probe to the center of the direct side, right over the coals, put the lid on, and take a reading when the temperature stabilizes. Make sure you are using a thermometer that can withstand high heat. It can get 600°F or more on the hot side. Write down the reading.
4) If you cannot hit the marks, start looking for leaks. On cheap cookers, where the lids and doors do not seal tightly, oxygen can enter through unauthorized gaps and the hot stuff escapes through these false chimneys. If you have a cheap offset smoker, you almost certainly have this problem. After you’ve tamed leaks and if you still can’t control the temp, then experiment with throttling back the exhaust, but try to never close it more than half way.
5) Watch the temperature drop as the coals burn down. This is a situation you will see often when you are doing long cooks. The coals will start to dwindle and you will need to add more. Get a feel for what happens when they die and how many coals you need to add to keep the temperature stable.
6) If you need to add combustibles, it is best to add fully lit coals as soon as you see the temperature sliding down. It will take you some experimenting to learn how many to add. When coals are fully lit and burning steadily, you can control temperature more easily by controlling the flow of oxygen to the coals. You have only one variable with which to fiddle.
7) The problem with adding a few lit coals at a time is that you have to watch the cooker like a bachelor at a beauty pageant, and when you see the temperature sliding down, light a dozen or so coals, wait for them to ash over, and then add them. In all likelihood, you’ll need to do it all again within the hour.
8) You can add unlit coals, but they produce a lot of smoke and they build in temperature as they ignite, raising the temperature in the cooking area. You will probably need to throttle back on the intake as the coals become fully engaged.
9) Every cooker design is different so you need to master your tool by practicing and you need to calibrate it by doing dry runs without food and record the temps from a digital thermometer on a cooking log. You can fine tune temperature by making sure the coals aren’t buried in ash, by adding hot or cold water to a water pan, and with a thermostat that controls airflow based on oven temp.
Dry runs for other grills and smokers
If you are burning firewood, I recommend you use only glowing embers from logs that you started burning on the side. As you gain experience, you can experiment with unlit logs. Click here for more on grilling with logs. Click here for smoking with logs.
There are soooo many different outdoor cookers on the market, I can’t go through the steps for each of them, but if you read the above, you should get the idea. Read my articles on the Best Setup for Offset Smokers, and the Best Setup for Bullet Smokers like the Weber Smokey Mountain. Do dry runs, change one variable at a time, take notes, and learn how to get to 225°F, 325°F, and Warp 10.
Dry runs with water pans
There are many times when you will want to place a water pan in your grill or smoker. A water pan is a great way to stabilize heat and add humidity to the oven. Humidity alters heat transfer, dehydration of the food, and mixes with combustion gases to improve the flavor. Read my articles on the Best Setup for Charcoal Grills, and the Best Setup for Gas Grills. After you become familiar with the concept, then you want to go back and calibrate your grills and smokers with water pans.
Seasoning a new grill or smoker
When you get a new grill or smoker, in the cooking chamber there is often dust, grease, oil, metal shavings, or cardboard dust from the manufacturing and shipping process. The goal of seasoning a new grill is to remove all traces of contaminants, seal the pores, and bake the paint.
Begin by wiping down all surfaces with soap and water and rinse thoroughly. Let it dry and then spray a little vegetable oil on everything inside the cooking chamber. Fire it up, toss in some wood, say eight ounces or so, and get it as hot as you can for about 30 minutes with all the vents open so anything left from the factory or shipping will burn.
This will start coating the sides with carbon and smoke that will cause condensation to drip off when you are cooking. You can then start cooking while the oven is hot, or let it cool and cook later.
How to place a probe
Most grills and smokers come with a bi-metal dial thermometer mounted in the lid. Well that’s usually 6 to 8″ above the cooking surface, and the temp up there is drastically different from where the food is. Remember, heat dissipates rapidly as you move away from the heat source. Combine this fact with the fact that dial thermometers, even the best, are not terribly accurate, and the conclusion is that these things are practically worthless. You might as well paint them over.
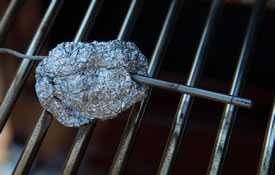
Place your digital thermometer probe 1 to 2″ above the cooking surface but don’t let the tip touch the metal of the grate which is hotter than the air surrounding it. Some thermometers, like the Maverick, come with a handy clip that does the job just fine. If you don’t have a clip, use a small potato, a radish, or a wine cork. Make sure the tip, where the sensitive parts are, protrudes from the veggie. Don’t use a wine cork in very hot parts of the grill, it can catch on fire and damage your probe.
Paint your grill silver?
If the goal is to maximize heat in the cooking chamber of a grill, then why do so many manufacturers paint their grills black? Black absorbs heat as any black car owner can tell you. Black is a good color for a smoker, but not a grill. The goal of a grill is to heat the meat, not the metal. The goal of a smoker is to heat the cooking chamber so it holds steady for long slow cooks. Paint a grill black and all the heat goes into the metal. Same theory as why photographers use white, silver, or gold reflectors. They bounce the light, which is energy.
For your first cook with a new smoker
I know you want to do brisket or ribs. Don’t. Brisket is tricky and there are many opportunities for failure. Ribs are not so tricky, but if you don’ have things under control they can easily be overcooked.
Start off on the right foot. Do a pork butt and make pulled pork with my recipe. It is almost impossible to screw this up. Pork butt can withstand wild changes in temp, too much smoke, and many other problems you can have with a new toy. And it is cheap!
If there are hotspots on your gasser
If you gas grill is hotter in one area than another, first take a look at the burners and make sure all the holes are unobstructed. Poke a paper clip or needle through them. Then make sure the diffusers are clean. Carbon buildup can block heat transmission. If either are corroded, replace them. If you continue to have hotspots, Dr. Blonder, our science advisor says “By some thin stainless steel wire in the hardware store. Insert one end in a hole of the burner and wrap the rest around the hole to block it. Do not use solder.”
Before you can post a comment or question you must sign into our commenting partner, Disqus. This helps make sure everyone hanging around the grill is civil. We do not tolerate nastiness, racism, porn, inappropriate language, or attacks on others. All comments are the property of AmazingRibs.com and we reserve the right to quote them, edit them, delete them, and block people from making future comments.
Please leave comments and questions on the same page that is devoted to that subject so others can see questions and our answers when they are reading about the subject. You must enable JavaScript to use the comments section, and you must accept cookies to post comments. Note: the software that runs Disqus is different from the Pitmaster Club, so members need to sign into the Pitmaster Club separately.
Moderators