


The key to success in any grilling project is control over time and temp. The best way is a 2-zone setup. This gives you a hot direct heat zone when you need to brown the surface, and a cooler indirect zone where the food can cook by convection airflow when you want to gently and evenly warm the interior of the food.
Water pans are a great addition to the cooking environment. They absorb heat and radiate it back evenly mitigating temperature fluctuations, and they add humidity to the air helping to reduce evaporation from the food. The moisture also mixes with the smoke and combustion gases to create wonderful bacony flavors.
Hardwood or fruitwood adds smoky flavor and complexity. But it is easy to ruin food with too much wood. Your exact setup may be different than mine if you don’t have a Weber Kettle, but if you follow the concepts, killer barbecue and grilling are in your future. Click here for more info about meat science. Click here for more about the thermodynamics of cooking.
Now this is important: Every grill design is different. The three key temps you need to master are 225°F, 325°F, and Warp 10 (pedal to the metal). The first thing to do is to test and calibrate your grill without food so you can see how it performs. Read this article about calibration and dry runs. Once you have your grill figured out, it will take only a few minutes to set up the next time. It is essential, required, necessary, to have a good digital thermometer since most bi-metal dial grill thermometers are next to worthless. They can be off by 50°F! You can’t cook unless you know your oven’s temp!
There are several ways to start a charcoal fire, but my favorite is with a chimney (click the link for more on the subject). It is a tube with an upper compartment and a lower compartment. Put newspaper in the lower compartment, charcoal in the upper compartment, light the paper, and in about 15 minutes you have a measured quantity of charcoal ready to go and if you do it the same way every time you can get pretty consistent. Consistency is important!

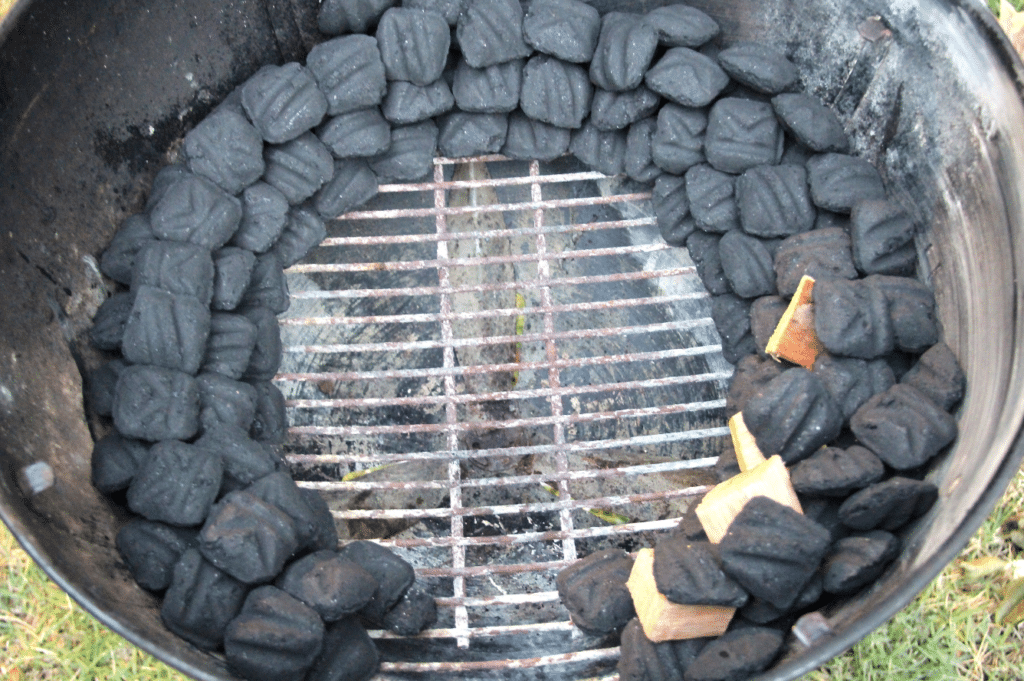
Weber and other grill manufacturers recommend a method of banking the coals on two sides with a pan of water in the center, underneath the food (shown at left). This concept is called 2-zone cooking and it is an essential concept in good outdoor cooking. But there is a better way that gives you more indirect cooking area and won’t get the meat too hot on the edges.

Bank the coals against only one side, not two. This way you can start thick steaks at a low temp on one side, bring the inside up to close to your desired finish temp, and then quickly crisp the exterior over the high heat. This technique, called reverse sear is a great way for cooking thick steaks. For tough cuts like ribs, pork butt, or beef brisket, you also use the indirect side. For ribs, you can add the sauce at the end so it doesn’t burn, and move it to the direct heat to crisp it quickly (see my article on Saucing Strategies). Fill the pan with hot water so the coals don’t burn down while heating up the water. Don’t bother using apple juice or other flavored liquid. It makes no difference in flavor and just wastes money.
If space allows, place another pan of hot water directly above the coals. It adds more moisture. Position the grate with a handle over the coals, as in the photo at right. This makes adding more coal and wood chips easy. Some grates have hinges to make adding coals easier. Weber sells a grate like this. With rib racks to hold the ribs on end you can get 3 to 4 slabs of baby backs on the grate. But beware of rib racks, the meat can be very close to touching and if the space is less than an inch, you should add 30 to 60 minutes to the cooking time.
And while we’re at it, let’s debunk a myth. The parabolic shape of the Weber Kettle is not a more efficient a heat reflector than other shapes. By far the vast majority of the heat is radiated directly from the surface of the glowing coals with some more reflected from the sides. Very little heat is being reflected off the curved bottom of the bowl. There is a solid barrier in the way: The bed of coals. Any heat that hits the bottom of the kettle just bounces back into the coal pile. So the parabolic shape of the kettles is no more efficient than a square box.
Make a burnt offering
Here’s a neat trick: Set up for 2-zone cooking with meat on the indirect side. Instead of the water pan on the top grate, put a hamburger, or some meat trimmings, or even fat trimmings. Meat drippings incinerate when they fall on hot coals and create flavor molecules that land on the meat and can really add character. They will burn to a crisp, they will cause flareups, but your meat is off to the side so it won’t burn. A burnt offering may also cause a rise in temp, so you may need to compensate by damping down the lower intake vent.
Controlling temperature
With charcoal cooking there are two fuels: Charcoal and oxygen. I know you don’t often think of oxygen as fuel, but it is just as important as the charcoal. Without it the fire dies. You control the heat by controlling the supply of oxygen with the intake vents and the exhaust vents with dampers.
Crack the bottom vents so they are open half way. Place the lid on so the vent holes are positioned over the meat and leave them open at least half way. That way the smoke must travel across the food to escape. Put a thermometer probe on a cable under the lid or into a vent hole on the lid to read your temp. Place the probe next to the meat, not in the dome. The temp is different there. Leave the top vents open at least half way at all times or you risk a sooty buildup on the meat, or worse, bitter creosote. Control the temp by controlling oxygen to the charcoal with the bottom vents not the top. Click here to read more about Controlling Temperature With Vents.
Don’t lift the lid unless the temp soars or dips. If it goes up, then just add cold water to the top pan to lower the oven temp. You can also close the bottom vents a bit, but don’t shut them off or the coals may die and the wood will smolder and generate bitter tasting smoke. If the temp drops too low, open the vents wider. You may need to knock ash off the coals with a stick, or remove ash if it blocks airflow.
After an hour or two you may need to add more coals. On a kettle, you will probably need to add six coals every 30 to 60 minutes depending on the ambient temperature and wind. If possible add hot coals, but cold coals will catch pretty quickly. Again, do some dry runs to see how your system responds.
You may find that you need to slide the lid off partially in order to hit your target as in the picture below. Here I have the hot coals pushed all the way to the left and the meat is pushed all the way to the right. The lid off partially off, slid to the left, so hot air from the coals flow over the meat, but it is mixed with cooler air. The top vents can be open or closed as needed.

I have even been known to remove the lid altogether and put an aluminum pan over the food as a makeshift lid on a hot day and if the fire is running hot. You need to experiment to master your instrument.
For long cooks
If you have a long cook you can sometimes use the fuse method (a.k.a. the snake method). Make a C with the coals around the outer rim of the lower grate but leave a gap. Put some wood chunks on the starting end of the fuse. Pour half a chimney of coals into the gap touching only one side of the fuse. The meat then goes on a grate on top of the largest water pan you can find. I use a disposable aluminum pan. The water pan will protect the meat from direct heat, stabilize temps, and add humidity. You will need to experiment with how many coals to use and the vent settings. Start by building the fuse two briquets wide and two high with the vents wide open. Then throttle back the bottom vent if it is running hot.
 Sign up for a free trial of the AmazingRibs.com Pitmaster Club and experience everything that the world's largest membership-based BBQ and grilling community has to offer!
Before you can post a comment or question you must sign into our commenting partner, Disqus. This helps make sure everyone hanging around the grill is civil. We do not tolerate nastiness, racism, porn, inappropriate language, or attacks on others. All comments are the property of AmazingRibs.com and we reserve the right to quote them, edit them, delete them, and block people from making future comments.
Please leave comments and questions on the same page that is devoted to that subject so others can see questions and our answers when they are reading about the subject. You must enable JavaScript to use the comments section, and you must accept cookies to post comments. Note: the software that runs Disqus is different from the Pitmaster Club, so members need to sign into the Pitmaster Club separately.