


If you haven’t bought your grill yet, read my gas grill buying guide first. Heck, even if you have one already, read it because there’s good info there on how they work.
The first thing to do is to season it and calibrate your grill or smoker by doing a few dry runs without food. On a new cooker, this will burn off any manufacturer’s grease, and give you a sense for how to set it up to hit the two important target temps that almost all my recipes use: 225°F and 325°F. Like a musician, you must master your instrument to make great art.

Of course, in order to do this, you absolutely positively must have a good digital oven thermometer. I don’t care how much you spent on your shiny new toy, the bi-metal dial thermometer that came with it is probably cheap and unreliable and likely to be off by as much as 50°F. Worse still, it is mounted in the dome, and the temp down on the grate where the meat sits is much different.
Controlling temp and mastering 2-zone cooking
| Here are some of the many possible settings you might use on a three burner grill to hit the target temps. | |||||
| On Off Off | On On Off | Off Low High | Off Low Low | Off Off High | Off Medium Medium |
| You can also control the temp by placing a water pan above the burners. Size and location of the water pans are important. To get the setup right, do some dry runs without food. Experiment. Click the link to learn how to calibrate your grill. | |||||
Controlling temperature on a gas grills and smokers is simple. Turn the knobs. Well, actually, it’s not always that simple. Alas, knobs on gas grills don’t tell you the temperature, so you need to figure that out when you calibrate. Surprisingly, depending on the outside air temp, wind, and how well the hood is insulated, turning the dial might not change temp that much. On some grills, with all burners pegged, on a 70°F day, the difference between high and low might only be 50°F! From the food’s standpoint, the difference between 550 and 500°F is not huge. The temp in the middle of the main cooking grate can be a lot different than on the sides, perhaps 50°F hotter in the center than the edges.
Unlike your indoor oven, where low is around 200°F, on a gas grill, low is probably closer to 300 or 400°F!
Fortunately, you have another tool with which to control temperature. On better grills you have more than one burner, the more the merrier. I recommend you buy at least three burners, although four is ideal. Then you can turn, for example, the left burner on high, and the one next to it on low. That might get you to the temp you want on the indirect side. The trick is figuring out the best settings to get you to the target temps. My recipes usually call for 225°F, 325°F, and Warp 10, as hot as you can get. Achieving these marks is tricky, because weather can significantly impact the temp within the grill. More on that in my article on calibrating.
The key to success in any grilling project is control over time and temp. For cooking most foods, you do not want roaring heat, you want indirect heat. This is an important core concept in mastering outdoor cooking and you should read my articles on 2-zone or indirect cooking, my article on Meat Science, my article on the Thermodynamics of Cooking, and my article on cooking temperatures. While you’re at it, read my article on grill maintenance.
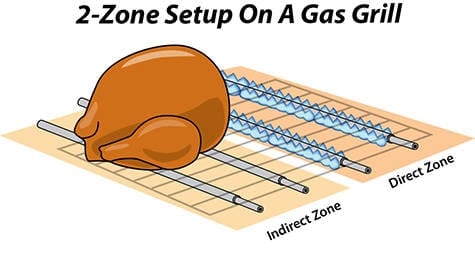
Here’s how to set up a gas grill for 2-zone or indirect heat cooking to get great restaurant quality flavor, the best you’ve ever made, and the best on the block. And, trust me on this, the flavor is as good as anything you can get on any fancy schmancy smoker. Really!
Most gas grills come with more than one burner nowadays because the concept of indirect cooking is becoming better known. If your grill has only one burner, you can still cook indirect with a water pan, described below.
Unfortunately grills don’t have thermostats and the built-in thermometers are generally worthless. To become master of your instrument, you need a good digital oven thermometer and you will need to spend a few hours trying the different combinations and writing down the oven temp so you can use your notes later.
On a three burner grill such as the Weber Genesis, you can set up indirect heating several different ways. The one you chose will depend on how cold or rainy it is, how much meat you have, and how hot you want the oven. You need to find what works best. Just get the heat be all on one side, doesn’t matter which. Don’t forget to take notes!
As you can see, there are many many possibilities. What’s the best setup? It varies for every grill, the weather, how much cold meat is on the grill, and the desired cooking temp. But some sort of indirect setup is usually the best.

Every grill is different, so your exact setup will be different than mine, but if you follow the concepts, killer smoked meats are in the near future. This method can also be used for indirect cooking without smoke. If you have a grill with only one burner, or if you have more meat than will fit in the indirect zone, try this technique.
Put a pan of water between the burner and the food. Put the wood as close to the flame as possible. Voila, indirect heat.
The water absorbs heat and helps minimize fluctuations in temp. The moisture also mixes with the smoke and propane combustion gases and creates flavors you cannot get with smoke alone. But this is important to note: You are not steaming the meat! Steam can make the meat mushy and destroy meat flavors. If you keep the oven temp at 225°F, the water should not boil because the surface area will allow evaporation that will cool the water keeping it below 212°F. Hard to believe, but true. If the water is boiling, you are running hot. Turn it down.
There are two ways to use water pans, depending on the type of grill you have. Here is how I do it on my old Weber Genesis with three burners, front center, and rear. Some gas grills have more or fewer burners, so you may need to adapt this method to fit your rig. But the concepts are the same. Read my article the Science of Wood for some tips on how to handle the wood.
Method 1: Water pans under the grates
Get a disposable aluminum roasting pan or two that are, ideally, just about the same size as the interior walls of your gas grill. They should have 2-3″ high sides. The pans will get smoke stains on them, so do not use your best roasting pans! If you can, remove your grill’s grates and put the pan on top of the burner covers. Do not put the pan right on top of the burner tubes. Fill the pans to within 1/2″ of their rims with hot water. Don’t waste your money using apple juice or something else. It doesn’t flavor the food.

The grates are placed over the pans and a thermometer is placed on top of the grates over the water near the meat. I use my grill’s center burner only and start on medium heat. You might chose to fire up only a back burner or the left burner. The number of burners may depend on the temperature of the day.
Let the oven come up to temp and stabilize. This could take 30 minutes or more with all that water to heat. The target is 225°F. Adjust the flame up or down, and if you need more heat, fire up a second burner. When you’ve got everything adjusted, remember the settings or write them on a cooking log.
Method 2: Water pans on top of the grates
If you cannot put pans under your grates, you can put them on top and use wire baking racks or the grates from your indoor oven on top of the pans. Another option is to use a broiler pan. It is shallow so you will need to watch the water level during your cook. Fire up the grill, bring it up to 225°F or as close as you can get.

Smoke
For smoke flavor, use hardwood chunks, chips, or pellets. You do not need to soak the wood! For an explanation of wood and smoke, read my article on the Science of Wood.

On gas grills with inverted V shaped “flavorizer bars” like Webers, you can often just put a bug chunk of wood in the gap between hot flavorizer bars. It should smolder there just fine. If it bursts into flames, you need to starve it of oxygen, so you can wrap it loosely in foil and poke a few holes in the foil or use chips and pellets in a pouch.

Another option is to make a foil pouch and poke some holes in it. Place the pouch under the cooking grate as close to the flame as possible. Try to leave the flavorizer bars in place, they protect the burner from drips and clogging, but if you just can’t get the wood to smolder, you may have to lift the bars. Just make sure the wood is over the hottest jets as you fiddle with the burner config to get it to 225°F. All this is described in my article on the Science of Wood.
If the wood won’t smoke because the burners are not hot enough, put the wood onto a burner and turn it on high until the wood smokes, then dial it back. Or try starting the wood with a lighter. Another trick is to place two charcoal briquets on the heat diffusers above the burners. The charcoal will ignite, but they aren’t hot enough to significantly change the oven temperature. Put the wood chunks wrapped in foil on the hot charcoal and they should start smoking in a few minutes.
Depending on how many vents are in your grill (they are mostly necessary), you may need several pouches. You will need to experiment without food to find out and calibrate your machine. You will need to experiment without food to find out and calibrate your machine.
I am also fond of scattering pellets, chips, or sawdust on a product called GrillGrates ™. These extruded grill grates have a flat bottom with perforations. The bottom get hot enough to create smoke, and with things that cook quickly, like fish filets, they can deliver smoke flavor in a hurry.

The meat
Put the meat on the rack in the indirect zone or above the water. Add more hot water if you need it during the cook. As long as the meat is hovering above the water, it will not burn. You will be amazed at the rich, complex flavors you can get with this simple technique.
Try a burnt offering
Meat drippings incinerate when they fall onto hot flavor bars, ceramics, or lava rocks, and they create flavor molecules that land on the meat and can really add character. So try putting a hamburger, or some meat trimmings, or even fat trimmings above the hot flames as a burnt offering. They will burn to a crisp, and they may cause flareups, but your meat is on the other side so it won’t burn. They may also cause a rise in temp, so you may need to compensate by turning down the gas.
For searing: Direct heat gas grilling tips
It is desirable to sear the exterior of meat as dark as possible without burning it so there are times when you want high heat and there are times when you want low heat. Here’s how to sear on a gas grill:
- Preheat the grill for 15 to 20 minutes and adjust the temp before putting on the food.
- Don’t crowd the cooking surface. Leave room to move food away from flareups. 2-zone is still the best setup if you have the space.
- Put the lid down for foods thicker than 1″ so it can cook from all sides.
- Leave the lid up for foods thinner than 1″ so the top remains cool and you can get good browning one side at a time without overcooking the center.
- For foods thicker than 2″ start on the indirect side, finish on the direct heat side. This is called reverse sear.
- Most foods will benefit from a sprinkling of salt and if you can leave it sit in the fridge a few hours the salt will migrate to the center and flavor it throughout as well as alter the proteins so they hold in moisture.
- Pat food dry before cooking unless it has been marinated. Dry food browns better. Moisture on the surface creates steam and prevents browning. That’s a major reason I am not a big fan of marinating.
- Just before cooking, a thin coat of oil on dry meat promotes browning.
- If you are using a sweet sauce, add it near the end of the cook because the sugar can burn.
- If you are having trouble getting a good dark surface, remove the grates, turn one sideways and lay it right on top of the flavor bars, close to the flame. Sear with the lid up. There will be hot and cool spots so be prepared to move the meat around.
- Another option is to put a griddle or a frying pan on the grill, high heat, get it blistering hot, add just a little oil to prevent stickling, and sear by conduction on the metal. It should only take two to three minutes per side. This is a good technique for reverse seared meats. You start them indirect, low and slow, with a little smoke, and then Maillard the outside in a hot pan or on a griddle. No, it’s not cheating. It’s making food better.

Why all the vents on gas grills?
Gas grills have lots of vents and gaps under the lid. They are there for safety. They seem to prevent you from getting maximum heat to the cooking surface. They also make it hard to create, capture, and control smoke, making smoking tricky, but it can be done.
I asked the VP of Product Development at Weber, why so much air flow? He explained that for a gasser to burn cleanly, with minimal soot, the gas/air mix must be balanced. Most of this happens at the junction between the pipe just behind the knob and the pipe that goes to the burners. This is called the venturi, and you can adjust it on some grills if you need to. Others, Webers among them, lock the venturi so they cannot be adjusted. You shouldn’t need to.
But gas grills also rely upon outside air to keep the burn clean and move combustion gases through, so they are engineered with louvres below the burners or in around the dome. There are also government mandated safety regulations that protect us from leaving scalded flesh on the handles.
But the marketing teams are well aware that shoppers look for the highest BTU production, even if this is not a direct indicator of how hot the cooking surface is and how well it cooks. So some will crank up the BTUs, and then allow the heat to vent out the back in order to meet regs. Others, like Weber, can dial down the BTUs, minimize the ventilation, and still generate plenty of heat.
How gas systems work and how to troubleshoot them
Gas grills have a system for regulating the flow of gas from pipeline or tank, mixing it with oxygen, igniting it, and turning the flow up or down to adjust the temp. A number of things can go wrong with the process, although they rarely do, but you need to maintain the system to keep it efficient, operating at optimum heats, and make sure it is safe.

In order to function properly, the propane tank or natural gas pipe must be connected properly. Keep in mind that for safety the threaded connection works in reverse of the normal “righty tighty, lefty loosey” rule. Gas connections tighten when you turn them to the left.
There is often a flexible hose connecting the gas to the grill, and somewhere along the line is a flying saucer shaped regulator. Look for cracks, cuts, or kinks in the hose. If there is anything suspicious, replace it. Wipe the threads on all sides before mating them. The regulator has a small hole on the top. Make sure it is not clogged. To protect it, turn it so the hole is facing downward. This regulator is specifically matched with your grill, so if something is wrong with it or the hose, don’t fiddle with it, just get the numbers off it and buy a new one of the exact same kind. No substitutions. It must match. I have more on regulators below.
If you smell or suspect a leak, mix up some soapy water and with a brush or cloth, paint it on the tubes. Open the tank or pipeline valve and look for bubbles. If you find leaks, turn off the gas immediately and call the manufacturer or a licensed technician experienced in working with gas systems.
The hose will probably connect with a brass pipe that carries the fuel to the valves, one for each burner. That connection needs to be tight. The valves are controlled by knobs. Each knob must turn easily. If a valve is acting up, you can remove the knob and look around, but you should not risk breaking it. Contact the manufacturer for instructions on replacing it.

There is a short brass pipe coming from the valves. It floats inside another pipe called the venturi. It is like the carburetor. It is where air and gas mix. Make sure the pipe is centered in the venturi and there are no obstructions like leaves, spider webs, or wasp nests.
The venturi connects to the burners. They are usually brass, stainless steel, or aluminum pipes with small holes, or jets, from which the flames emit. Sometimes you can remove the burners to clean them, but often that is a real pain. But you need to make sure the burners are clean, so once a year scrub them with a wire brush, and stick the end of a paper clip into the holes to make sure no carbon is blocking them.
If you can easily remove the burners do so and clean out holes, scrape underneath, and put a hose on the end to force water out the jets and flush out any dirt or insects.

The next step is to check the color of the flame. This is best done at night. Reconnect the gas supply and open the valve. Follow the manufacturer’s instructions for igniting the burners. If the ignition doesn’t work, light the burners with a long handled match or a stick butane lighter. After about 10 seconds the flame should be mostly blue with a small orange or yellow tip. If it is not, you need to adjust the mix to get maximum heat and not waste fuel.
The venturi were set at the factory and should not need adjustment, but occasionally they do. There is often a screw on the side of the venturi that allows you to rotate the air inlet cover and control the amount of air entering the system. Some venturi, like the ones on Webers, cannot be adjusted.
Modifying the gas flow to get low temps
Some gas grill owners find it hard to dial the temp down to 225°F, a temp which I recommend for a lot of low and slow cooking. So they go looking for solutions. Some want to reduce the amount of gas, a method that can work, but it must be done properly and is potentially dangerous. I do not recommend this technique, but I publish it here just to give the tinkerer an idea of what is involved and with the hopes of discouraging a common mistake or two.
Remember, gas is explosive. Fiddling with the gas supply system could result in an explosion or fire resulting in death and destruction of your home. I strongly recommend that you use a professional if you wish to modify the factory setup. Your local LP gas company will be glad to help for a fee.
Do not replace your factory regulator with a regulator with a different rating. The factory regulator is like a carburetor on a car. It is tuned for the pressure of the tank or natural gas supply, the needs of the grill, and it mixes in the correct amount of air. You can’t just replace an automobile carburetor with any old carburetor . My Facebook friend Wilson Holloway has worked with gas professionally for 40 years and he says the popular adjustable red regulator people use is designed for high pressure gas sources and should not be used. If you use a high pressure regulator on a low pressure burner it can blow the seals from the valves. A low pressure regulator on a high pressure burner will produce a flame about the size of a kitchen match.

Holloway says the best approach is to limit the volume of gas with a valve between the regulator and the grill with a brass needle valve like the one shown here. With a small valve after the regulator you can restrict the amount of gas going into the burner. It would still have the correct pressure but there would not be as much flow. To complete the installation you will also need a high pressure gas hose. You would then take the regulator hose off the grill, attach the needle valve, and attach the new hose to the valve on one end and to the grill on the other end. Be sure to use Teflon tape or pipe dope on the pipe threads to prevent leakage and test the connection by painting soapy water over the joints and watching for bubbles when the valves are open.
I asked the AmazingRibs.com science advisor Prof. Greg Blonder about this kluge and he explained that “After installing the needle valve, the air to gas mixture is no longer the same. The amount of air depends on how quickly the gas is moving through the system because the gas pulls air in. So you will have to adjust the air mix by playing with the venturi. Looking for a nice clean blue to clear flame. Not yellow.”
Frankly, if your grill is running too hot, I recommend you try to cool it with water pans, by leaving the lid slightly ajar, buy a dedicated smoker, or just cook at the higher temps.
How much gas is left?
There are a number of propane gauges that screw on in between the tank and the hose, but the two I’ve tried didn’t work. Another option is the Grill Gauge some of which are not much more than a glorified fish scale. An empty tank weighs about 17 to 20 pounds, contains about 20 pounds of gas, so a full tank is about 37 to 40 pounds. Hoist your tank and the gauge gives you a pretty good guesstimate of how much is left. I take mine when I exchange empty tanks for full ones. You’d be surprised how many are underfilled.

Here’s the least expensive gauge: Take a quart of warm water and pour it slowly over the side of the tank. It will warm the metal where the tank is empty and the metal where the liquid propane remains will remain cold. Run you hand down the side to locate the liquid level.
Of course you do have a backup tank, don’t you? And you do backup you computer don’t you?
Troubleshooting ignition
Always remember, ignite the grill with the hood open. Gas can build up under the hood and when you hit the ignition the lid can blow open. Or worse.
If you can’t ignite the grill it is usually either an ignition system problem or a gas supply problem.
The ignition system. If the igniter does not work, and if it is aligned properly, you may need a new one, unless you are at very high altitude where they sometimes fail. If there still is no ignition, locate the spark generator, usually a wire, where the spark jumps to the burner. Make sure the spark generator is located properly, usually about 1/8″ in front of a gas jet. If there is no spark, clean the igniter and check all the wiring to make sure it is connected properly. If it still doesn’t work, you should be able to light the burner with a long match, one of those long handled butane lighters, or a match held in a pair of tongs.
The gas supply system. If it still won’t fire up or if they don’t seem to be reaching a high enough temp, then the regulator may be misbehaving. Regulators contain a safety device that slows the flow of gas if it thinks it’s moving too fast. To outsmart it,
1) Turn off the gas at the propane tank.
2) Disconnect the gas line from the tank.
3) Open the grill lid.
4) Turn all control valves to high.
5) Wait for about a minute.
6) Turn all control valves to off,
7) Reconnect the gas line to the tank. Slowly turn on the gas at the tank, like 1/4 turn every 30 seconds.
8) Light the grill normally.
9) Your grill should now heat normally.
If it still doesn’t work try your spare tank. You do have a backup tank, don’t you? This is always a good idea so you don’t run out of gas in the middle of a cook. If it still won’t cooperate, call tech support.
To keep your regulator from sticking, when you are done cooking, make sure that you turn off the control knobs on the grill first, then turn off the tank valve. Then when you want to cook, open your tank valve slowly.
Troubleshooting low heat and hotspots
I often hear complaints about older gas grills that are just not getting up to the old temps or they are heating unevenly. Often you can troubleshoot minor problems yourself, but if there is any difficulty, don’t force anything unless you want a spectacular explosion.
Most gas grills have minor hotspots, but some can have major hotspots. A good sign that something is wrong is when the flame is mostly yellow. You want to troubleshoot by turning off the gas and disconnecting the hose from the tank or the source. Check all the connections starting at the tank and all the valves. Play close attention to the venturi, the place where air is mixed with the gas. Spiders often get in there when the grill sits idle.
On a piece of paper draw the cooking surface of your grill, roughly to scale. Divide it into quadrants by drawing a line down the middle of both sides. Then cover your grill grates with heavy duty aluminum foil from corner to corner. Place strips of bacon evenly spaced across the surface. With the lid up, turn the heat to medium high and cook the bacon. Notice which pieces cook fastest and mark them on your drawing. Those are your hotspots. Make note of your cold spots too. Now eat the bacon.


Before you can post a comment or question you must sign into our commenting partner, Disqus. This helps make sure everyone hanging around the grill is civil. We do not tolerate nastiness, racism, porn, inappropriate language, or attacks on others. All comments are the property of AmazingRibs.com and we reserve the right to quote them, edit them, delete them, and block people from making future comments.
Please leave comments and questions on the same page that is devoted to that subject so others can see questions and our answers when they are reading about the subject. You must enable JavaScript to use the comments section, and you must accept cookies to post comments. Note: the software that runs Disqus is different from the Pitmaster Club, so members need to sign into the Pitmaster Club separately.