


I know you want to buy an offset. It looks so macho. It says, “I’m serious about barbecue”. But learning to operate can take time so our offset and barrel smokers setups guide is here to speed the learning curve.
Yes, we know your local big box store offers them for as little as $200 but, these cheap ones have turned more people off barbecue than any other smoker. After one season of frustration, owners dump them and often never return to smoking. They kill the curious.

Let’s divide the world of offsets into two categories: EOS and COS. There is a big difference in quality between the Expensive Offset Smokers (EOS) in the $800 and up range like Horizon or Lang, and the Cheapo Offset Smokers (COS) in the $400 and under range. The most popular COS commonly found in hardware stores are Brinkmann Pitmaster, Brinkmann Smoke’N Pit Professional, Char-Broil Silver Smoker, Char-Broil American Gourmet, and especially the Char-Griller Smokin Pro. Stay away from them, please.
COS have serious shortcomings that can mar meals and marriages. At the core of the problem is the simple fact of physics: Heat and smoke want to go up, not sideways. So heat and smoke exit the firebox on one side and try to go up making the side of the cooking chamber next to the firebox much hotter than the side next to the chimney. So if you put on six slabs of ribs, some will be done way sooner than the others. Yes, you can move them around, but that’s a pain, and they still come out uneven.
COS also have poor fire management control because the fireboxes leak so badly so you cannot control oxygen and that is what controls temperature and smoke quality. The food chamber doors also leak so you can’t control the draw of air with the chimney damper. That hot air seeping out the doors also carries with it moisture from your meat.
COS are designed and build poorly. Paint flakes off and they are prone to rust.

EOS are made from thick metal that absorbs and distributes heat more evenly end to end, their doors and dampers are tight so you can really control temp. Some even have a duct system that forces the hot air to travel the length of the cooking chamber under a thick metal plate that warms the space from below, and the chimney is located on the same side as the firebox so that it pulls the warm air across the top of the food.

Please resist the temptation to buy a COS. If you have to look macho, get a drum smoker. It can cook circles around the cheap offsets.

Click here for an article with our impressions of many of the different offset smokers on the market, in all price ranges. But if you want something that looks macho and works well, get a drum smoker. At only $350 (shipping included), the Pit Barrel Cooker will cook circles around any COS. If you prefer, there is even an easy to assemble kit that you can build yourself, or they’ll build it for you.
How to tame your offset
If you have an offset, here are some important techniques and modifications to make, cheap or otherwise:
1) Cook with charcoal, not wood. Wood fires are too hard to manage in a COS, and they can easily spoil the meat with too much smoke, creosote, soot, or ash. A common question: “How much charcoal should I start with?” There are too many variables for a pat answer. It depends on how hot a day it is, how windy, how tight your cooker is, how heavy the metal is, how much cold meat is inside, and where the meat is in the cooking chamber (it can vary as much as 50°F from side to side). This is the craft of BBQ and it will take a few cooks for you to get the feel of your machine. Start with about 1 chimney of lit charcoal and a good thermometer and a cooking log.
2) Preheat the cooker. Start your coals and wait until the cooking chamber is up to temp before putting the meat in. This will help prevent bitter creosote from forming.
3) Add fully lit coals. Use a chimney to start the coals before you start cooking. Then, when the temperature begins to decline because the coals are fading, add only fully lit coals from the chimney.
4) Use good thermometers on both ends. Beware of the fact that the heat near the firebox can be 50°F higher than by the flue. Drill holes in the door on each end and insert a good digital thermometer probe in each to monitor the temperature on both sides of the cooking chamber. There are several models that have more than one probe. If you must, mount a couple of Tel-Tru BQ300 Bi-metal Barbecue Thermometers with 4″ stems as indicators, but use a digital next to the meat for real accuracy.
5) Don’t soak your wood chips or chunks. The wood absorbs only about 5% of its weight in water and the water just cools the coals when you add it. This can cause yo-yoing temperatures.
6) Keep the lid closed. Opening the doors, either on the firebox or the cooking chamber, upsets the delicate balance of oxygen on the coals.
7) Rotate the meat. If you have meat on the left and meat on the right, they will need to be switched halfway through the cooking.
8) Learn one vent at a time. Most COS have an intake baffle and a chimney baffle. Begin by controlling the temperature with the intake baffle only and leave the chimney wide open. The intake baffle controls oxygen flow to the coals and has the most impact on cooking temperature. The chimney controls smoke in the cooking chamber (somewhat), and the temperature differential from one side to the other (somewhat). Start with the intake wide open until the chamber is up to temp, and then close it half way or more until the temp stabilizes in the 225-250°F range on the hot side. Never close the intake all the way or the fire can starve and produce creosote. Don’t touch the chimney until the cooking chamber is stable for 30 minutes or more.
9) Go easy on the smoke. It is easy to ruin meat with too much smoke. Use chips, chunks, or pellets. Add about 4 ounces at a time in 3-4 doses every 30 minutes, starting as soon as the cooking chamber gets over 200°F.
10) Beware of the weather. The ambient temperature will effect the cooking temperature, and rain (or snow) and wind can significantly affect cooking temperature.
11) Pull up a chair. Bring a book, a beer, and some tunes, and stay near your cooker.
12) Protect your investment. Your COS will rust. When it is not in use, use a cover or park it in the garage. Put your car on the street. It won’t rust. Sand out rust and repaint with heat-resistant paint. If you use it on the interior, let it dry thoroughly before cooking. The fumes are poisonous.
13) Use a water pan. Put a grate above the coals and put a water pan on the grate. This will add humidity to the smoke and help the flavor and moistness. Don’t bother putting water pans under the meat, and don’t waste money on apple juice in the pan.
14) Calibrate it with dry runs. The first thing to do after you assemble your new grill or smoker is to season it and calibrate it by doing a few dry runs without food. This will burn off any manufacturer’s grease, and give you a sense for how to set it up to hit the two important target temps that almost all my recipes use: 225°F and 325°F.
Of course, in order to do this, you absolutely positively must have a good digital oven thermometer. I don’t care how much you spent on your grill, the bi-metal dial thermometer that came with it is probably cheap and unreliable and likely to be off by as much as 50°F. Worse still, it is in the dome, and the temp down on the grate where the meat sits is much different. Like a musician, you must master your instrument to make great food.
15) Practice. Practice. Practice. Remember the old joke about the tourist who asked the street vendor how to get to Carnegie Hall? His response was “Practice. Practice. Practice.” Nothing could be more true for owners of COS. Practice without meat. Set it up and run through a cook so you can see how it behaves.
Modifying your offset smoker
You can make modifications (called “mods” by smokeheads) that will make your offset smoker work a lot better. Try the following mods to tune your pit, and scroll down to the comments section see how other clever folks have made these aggravating devices into serious smokers.
Add a deflector or a convection plate or a duct. Here’s the problem: The cooking chamber is a lot hotter on the side near the firebox. And as the heat moves to the other side it dissipates rapidly. If the cooking chamber is thick and tight, the heat will not dissipate as much. But most offsets are thin and leaky.
There are several ways to help mitigate the prob.
1) Buy a baffle from BBQ Smoker Mods.

2) Make a flap of metal that covers the opening from the firebox to the cooking chamber at an angle and bolt it on. It will deflect the heat and smoke downward. Or have a neighborhood body shop fabricate one for you. The picture here is a deflector made by Paul Salverda of Walnut, CA, from an aluminum cookie sheet and held in place by one self-tapping screw. He says the temperature diff between sides before the deflector was 40-50°F and now it is only about 10°F.
3) Cori Alcorn writes with this idea “I really want one of those convection plates but can’t afford [a commercial] one and my wife wouldn’t let me use one of her cookie sheets (she caught me with one of the old black ones that I thought would be fine and says it is her great grandmother’s…). So instead I wrapped the cooking rack closer to the firebox with foil and then poked slits in the foil and it seems to work pretty well. My temperatures evened out quite a bit. Just thought I’d mention my solution for the po’ man’s convection plate.”

4) Another option is to have a local body shop fabricate a baffle for you. Coleman Shelton did that and set it on bricks at right. A plate like this will radiate heat and move a lot of it over to the right side away from the firebox. Here is a supplier that sells prefab deflectors.
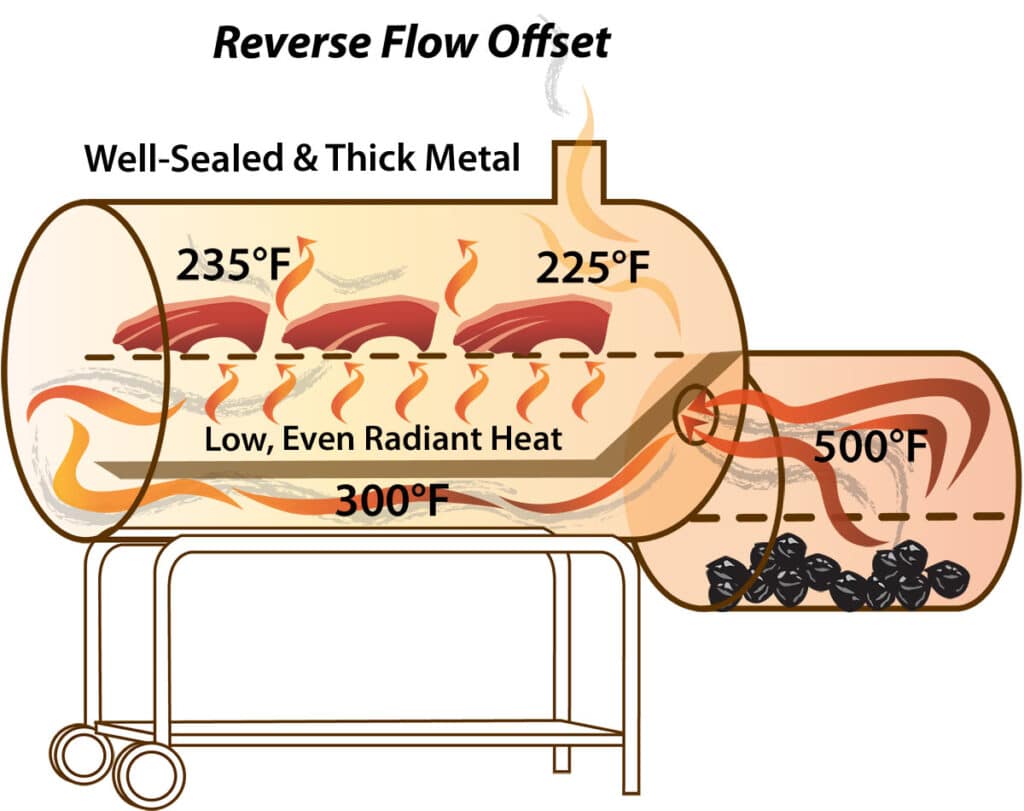
5) The ultimate solution is to fabricate a heavy steel duct like the ones built into the large commercial offset smokers and move the chimney to the side by the firebox. This design is called reverse flow. This directs all the smoke to the far side of the cooking chamber inside the duct, it travels up into the cooking chamber and across the food to exit the chimney. The duct also radiates heat up to the meat as shown in the illustration below.

Extend the chimney downward. Here’s the concept: These smokers have a chimney mounted on the top. Heat and smoke travel from the firebox across to roof of the cooking chamber to the chimney and out. If you can lower the intake of the chimney to the level of the cooking surface you can move the heat and smoke across the grates at the same level as the food. One way to do this is with some aluminum roof flashing from your hardware store. Roll it up, insert it into the chimney from below, let it expand to the same diameter as the chimney, and pull it down to grate height. I bought a roll of 0.0092″ thick aluminum flashing 14″ high and 10′ long. I cut off 8″ and made my chimney extension from that. Flashing costs about $8 for a roll.
Another way is to remove the chimney altogether, cover over the hole, and put in a new chimney down low as barbecue enthusiast Bruce Cook has done, above (photo credit: Bruce Cook). Here’s how he described the process: “I cut a hole just below grate level and welded an elbow to the side of the pit. Then I used an exhaust pipe off of a semi-tractor, I then stuck the exhaust pipe into the elbow. Any metal tube that is 4-6″ in diameter would work.” Clever fellow with the right last name, no?
Add a water pan to the firebox. I like putting humidity into the cooking chamber to help keep the meat from drying out. There is some evidence that moisture and combustion gases combine to improve the flavor. So after the cooking chamber is up to heat and stabilized, I put a disposable aluminum pan filled with water on the cooking grate in the firebox directly above the coal basket. Cost: About $1.
Increase the capacity. The capacity of my COS is about six slabs of St. Louis cut slabs laid lengthwise. For our big July 4 party, I need more capacity so I use baby backs, which are shorter, and three rib racks. This ups my capacity to 15 slabs. Cost about $75.
Add a bottom grate to the firebox. My Char-Broil Silver Smoker came with a grate for cooking meat inside the firebox directly over the coals. It mounts just below the door. I use that to sizzle in sauce when I am done cooking ribs. I am told some models come with a lower grate for the charcoal to sit on, but mine didn’t and I’ve never seen them on the Silver Smokers I’ve looked at in stores. The coals sit right on the bottom of the firebox with no airflow below them. So I bought a 13″ x 17″ grate from spare parts at Home Depot, and hack sawed it down to 13″ x 15″ so it would hover a few inches above the bottom of the firebox to allow air beneath the coals. Works, ahem, grate. Cost: About $10.

Make a charcoal basket. The technique is to build a charcoal basket that will hold a large pile of coals inside the firebox. With such a basket you can use the Minion Method of fire control. Invented by Jim Minion, this is a clever technique of maintaining constant temp for a long time by filling the basket part way with unlit coals and then you pour hot coals on top. The hot coals slowly ignite the coals below them and the temperature remains remarkably steady for long periods of time.
Here’s how to make a charcoal basket: (a) Go to your local body shop and ask them to fabricate a square box about 12″ wide x 12″ long x 6″ deep from flattened expanded carbon steel sheets with a 3/4 inch diamond (or whatever they had on hand). Make sure these dimensions will fit in your firebox first. They can cut a 4′ x 6″ length from a 4′ x 8′ sheet, fold it to 12″ x 12″ x 6″, and spot weld the edges together. There is no need for a bottom if you have added a lower grate to the firebox as described above. (b) Purchase the the expanded metal and bend it yourself. Then stitch the corners together with wire or wire coat hangars. That’s what Paul Salverda did in the picture above.
Make a mud pan charcoal fuse. “Mark from South Minneapolis” invented this clever device for creating a slow steady burn. You can put it in the firebox, but he prefers to put it on one side of the cooking chamber and no longer uses his firebox. The “fuse” (a.k.a. maze, C, or snake) concept is a clever idea. You pour lit coals on top on one end of the fuse and the coals ignite gradually, like a fuse, moving from one end to the other putting out a steady heat along the way. He says “Pick up two sheetrock mud pans from any home improvement store, about $10 each. [Use stainless steel only, galvanized can offgas toxins]. They measure 4″ x 14″ each, so two of them will occupy just 8″ of width yet the 3″ to 4″ height will hold plenty of coals and wood chunks with ease. Drill some holes in the bottoms, ends, and sides. Then cut matching notches out of each with tinsnips leaving the flap on one to create a bridge between the two trays. I didn’t permanently connect mine so I can place them individually or together at the same time. Fill with charcoal, leaving a space at one end for lit coals. Two trays will work on a 20″ barrel grill but if you have more space you can add a third or fourth tray to extend the burn time. If you’re doing a very long cook you can simply remove the tray of expired coals behind the fire, refill it while the other continues burning and place the refilled tray back in position. Pretty versatile and easy to do. Why didn’t I think of this before? Easy and cheap this set-up will produce a consistent 225°F temp with the proper fuel load for 4 to 5 hours.”

Plug the leaks. You can’t cook unless you can control the temperature and you can’t control the temperature if you can’t control oxygen to the fire. There are several products on the market that can help. Click here to see some of the sealants and gaskets available. Our page about spare parts has links to gaskets, sealants, deflector plates and more.
Thickness of the metal doesn’t matter that much. Metal absorbs heat but doesn’t radiate it much. Heat loss from cooking chamber is pretty much the same if the metal is thick or thin once it is heated up. Radiation is minimal from the metal either to the outside air or inside to the food. Think of holding your hand over a cast iron pan. Not that hot. Hold your hand 3” from the cooking chamber on your offset. Not that hot. The heat for cooking the food comes from airflow, not the metal. And airflow is so great. Insulating the cooking chamber. It is like insulating your house but leaving front and back door open.
The only advantage to thick metal is that it will help a little in stabilizing temp. I can help dampen temperature spikes. A better stabilizer is to put bricks in the bottom and cover them with foil. The cooking chamber will take more time to heat up, but it will hold heat longer and distribute it more evenly.
Of course preventing temperature spikes is best done by fire control. By cultivating a small hot fire. You want a small hot fire (read my article on combustion). Insulating the firebox makes more sense than insulating the cooking chamber.

Make cleanup easier. Some COS come with a small hole and a grease cup. It overflows quickly and only works if the smoker is tilted towards the grease cup. One easy solution is to line the bottom with foil. Another clever solution, add a ball valve as Paul Salverda did. Here’s what he recommends: “Scrub the inside of the smoker with cleaner and a wadded up piece of foil. Put a bucket underneath the valve. Pour hot water into smoker, open valve. Repeat rinse. Wipe up the remainder. Admire your handiwork. Cook something!”

Add a chimney cap. A chimney cap like the one here sits on top of the chimney, keeps the rain and snow out and prevents rust. The place I bought mine doesn’t sell them anymore, but maybe you can find a source.
Add a thermostat. Our thermometer database has multiple thermostat controllers for charcoal and log burners. Many are bluetooth or wifi enabled so you can watch and manage your temps with smartphones, tablets, and computers.
You can set it so alarms ring when certain temps are reached or after an elapsed time period. You can even hook it up to a wireless router and control it from a web browser.

Get a good cover. Keep rain, snow, wasps, birds, and other vermin out. Cheapo covers last only a year or two. A good cover costs about $60.
Steve Friend of Weatherford, TX, says “I have used a COS for several years with low maintenance and no rust on the exterior. It sits outside 365 days a year. Everytime I use it, after the cooking is done and while the cooker still warm, I get a cheap can of cooking spray (PAM) and spray the entire cooker from top to bottom. This kind of seasons the metal much like a cast iron skillet. So far so good, no rust and a shiny patina that makes it look new.”
Our page about spare parts has links to gaskets, sealants, deflector plates and more.
Char-Griller Mods

Check out the mods made by Ted Hellewell, San Jose, CA. He has added a rotisserie, wheels, and a stainless steel work shelf. In addition to a gas burner, and deflector plate, he has added a cast iron pan for wood chips above the burner. He says “The grate that the pan sits on needs to be as high above the burner as possible to slow the wood burning process and extend smoke times per load of wood. “I have made these same mods on three units for friends and family. My father also added them to his.”
Rehab an an oldie goldie
Coleman Shelton of Calvert City writes “I was about to buy a new smoker, and after doing a little research I had settled on the Brinkman Cimarron. After reading your article about setting up a horizontal smoker, I decided to try rehabilitating something the previous owner of my house left in the backyard (built with 1/8 & 3/16 steel – damn thing is heavy).
“Cleaned it up, added new wheels, added a [Char Griller] fire box to one end, added a smoke deflector using some bricks & sheet metal I had laying around. Made a charcoal basket from a fry basket I found in the bargain bin at the hardware store for $5. Used Dap High Heat Mortar to seal between the firebox & smoker, and to seal cracks.
“Ran a test yesterday and got 6 hours at 225°F on one basket of lump charcoal. Temp control was fairly easy. Used two digital thermometers to monitor, and only had 8-10 deg variance from end to end, measured at the racks.
“Total investment: $100. I figure I saved at least $500.”
Gas conversion
Jeffrey Hammac in Tampa, FL, has converted his Char-Broil Silver Smoker (COS) from charcoal to propane. Here’s how:

He bought a 20 psi regulator with hose for $25 and a high pressure cast iron burner for $11 at turkey fryers online.

You may be able to find these parts at a hardware store or grill specialty store. Make sure you buy the proper psi regulator for the burner you chose.

He drilled a hole on the inside of the fire bod large enough for the damper of the burner. He rested the neck of the burner on the inside of the hole.

There is a threaded stud at the bottom of the cast iron burner so he drilled a vertical hole centered in the bottom of the fire box and used some washers to correct the height after drilling the horizontal hole for the gas feed end. The burner does not come with a nut for the threaded stud so got one at his hardware store.

He bought the the lava rocks at Wal-Mart for $4. To keep the tank steady, he has strapped it down with a bungee cord.

He warns that if you put wood chips in a foil packet over the flame it will melt the packet so he puts it off to the side. I recommend you use a small cast iron pan for the wood chips, or put the right on the lava rocks.
Practice. Practice. Practice.
Cook one slab at a time until you have mastered the cooker and don’t invite company over until then. You should get it under control in one or two more tries.
 Sign up for a free trial of the AmazingRibs.com Pitmaster Club and experience everything that the world's largest membership-based BBQ and grilling community has to offer!
Before you can post a comment or question you must sign into our commenting partner, Disqus. This helps make sure everyone hanging around the grill is civil. We do not tolerate nastiness, racism, porn, inappropriate language, or attacks on others. All comments are the property of AmazingRibs.com and we reserve the right to quote them, edit them, delete them, and block people from making future comments.
Please leave comments and questions on the same page that is devoted to that subject so others can see questions and our answers when they are reading about the subject. You must enable JavaScript to use the comments section, and you must accept cookies to post comments. Note: the software that runs Disqus is different from the Pitmaster Club, so members need to sign into the Pitmaster Club separately.